Boatworks

  • Main
  • Louve
  • Typewriters
  • Workshop
  • Meritaten
  • Glypto
  • Motoko
  • Inspirations
  • About
IMG_6140.JPG

Frames repair - removing rivets, cutting scarf joints

April 14, 2019 by Lukasz Kumanowski

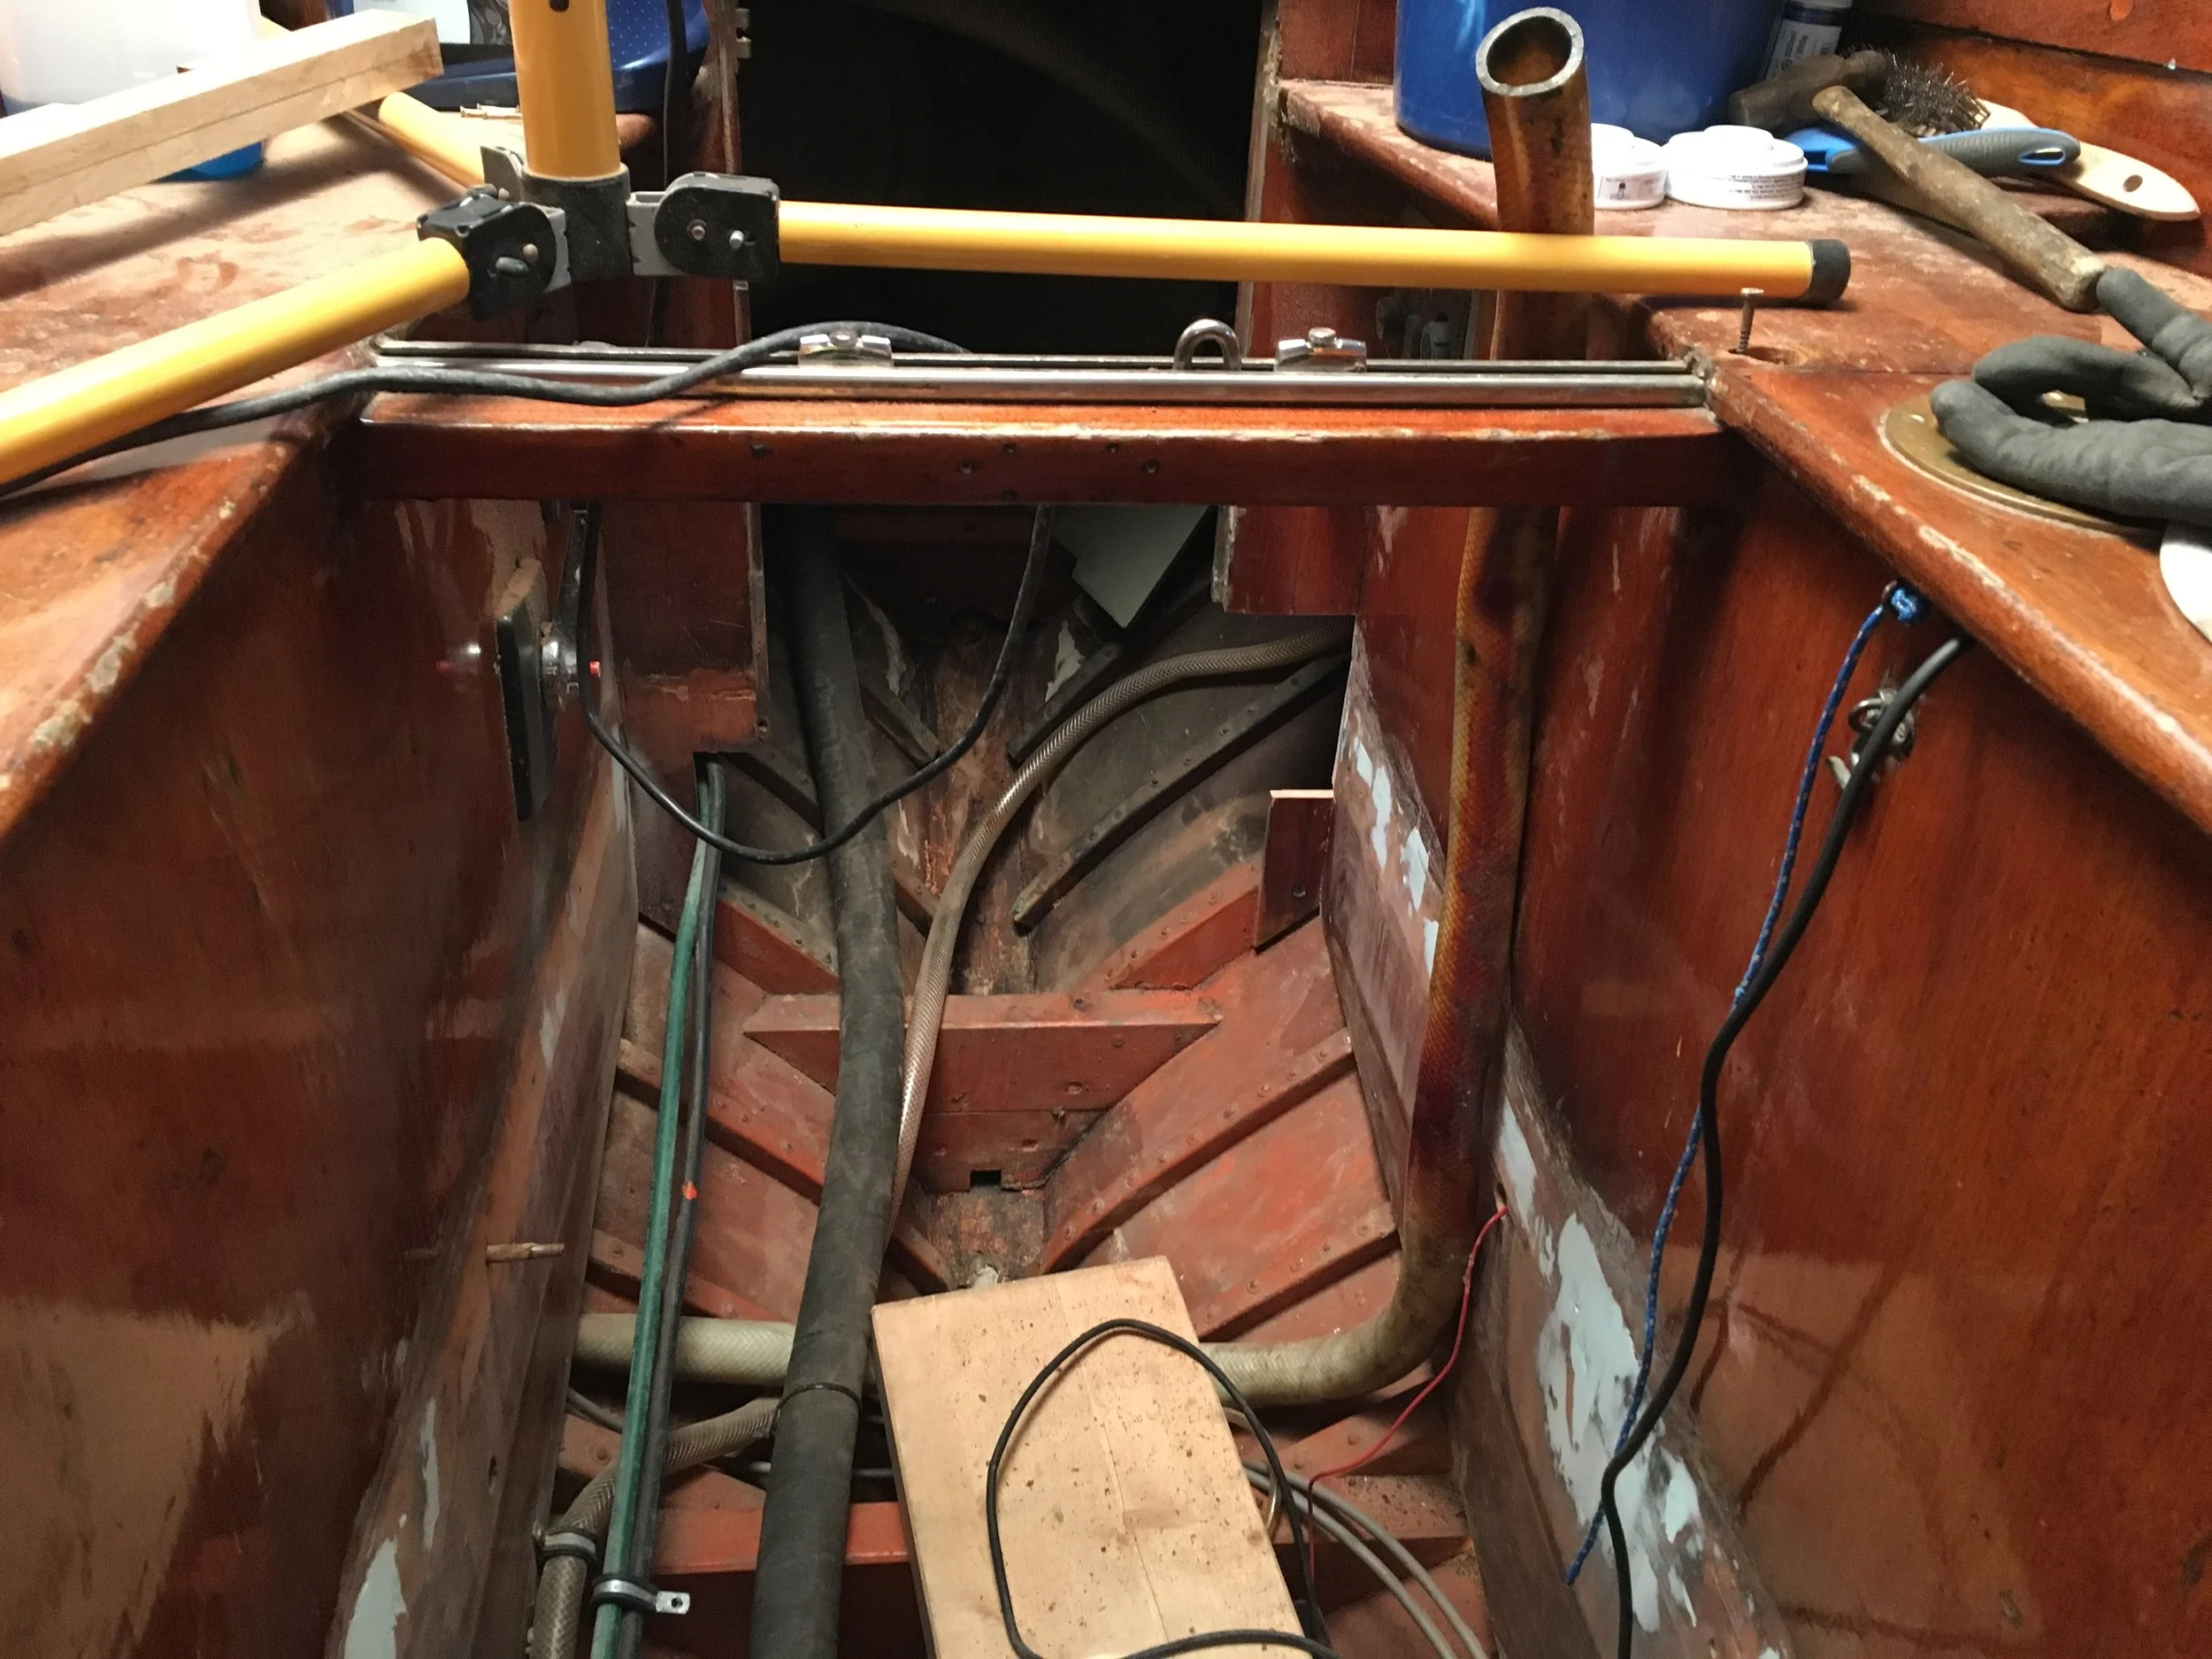
I’ve started repairing broken steamed frames, beginning in the engine room.

The minimum plan is to fix these 8 frames and the big frame (for which I’ve made a laminated, bent part) to be able to put Meritaten into sea. Once I have the engine back I will no longer have access there so it seemed logical to start from these frames.

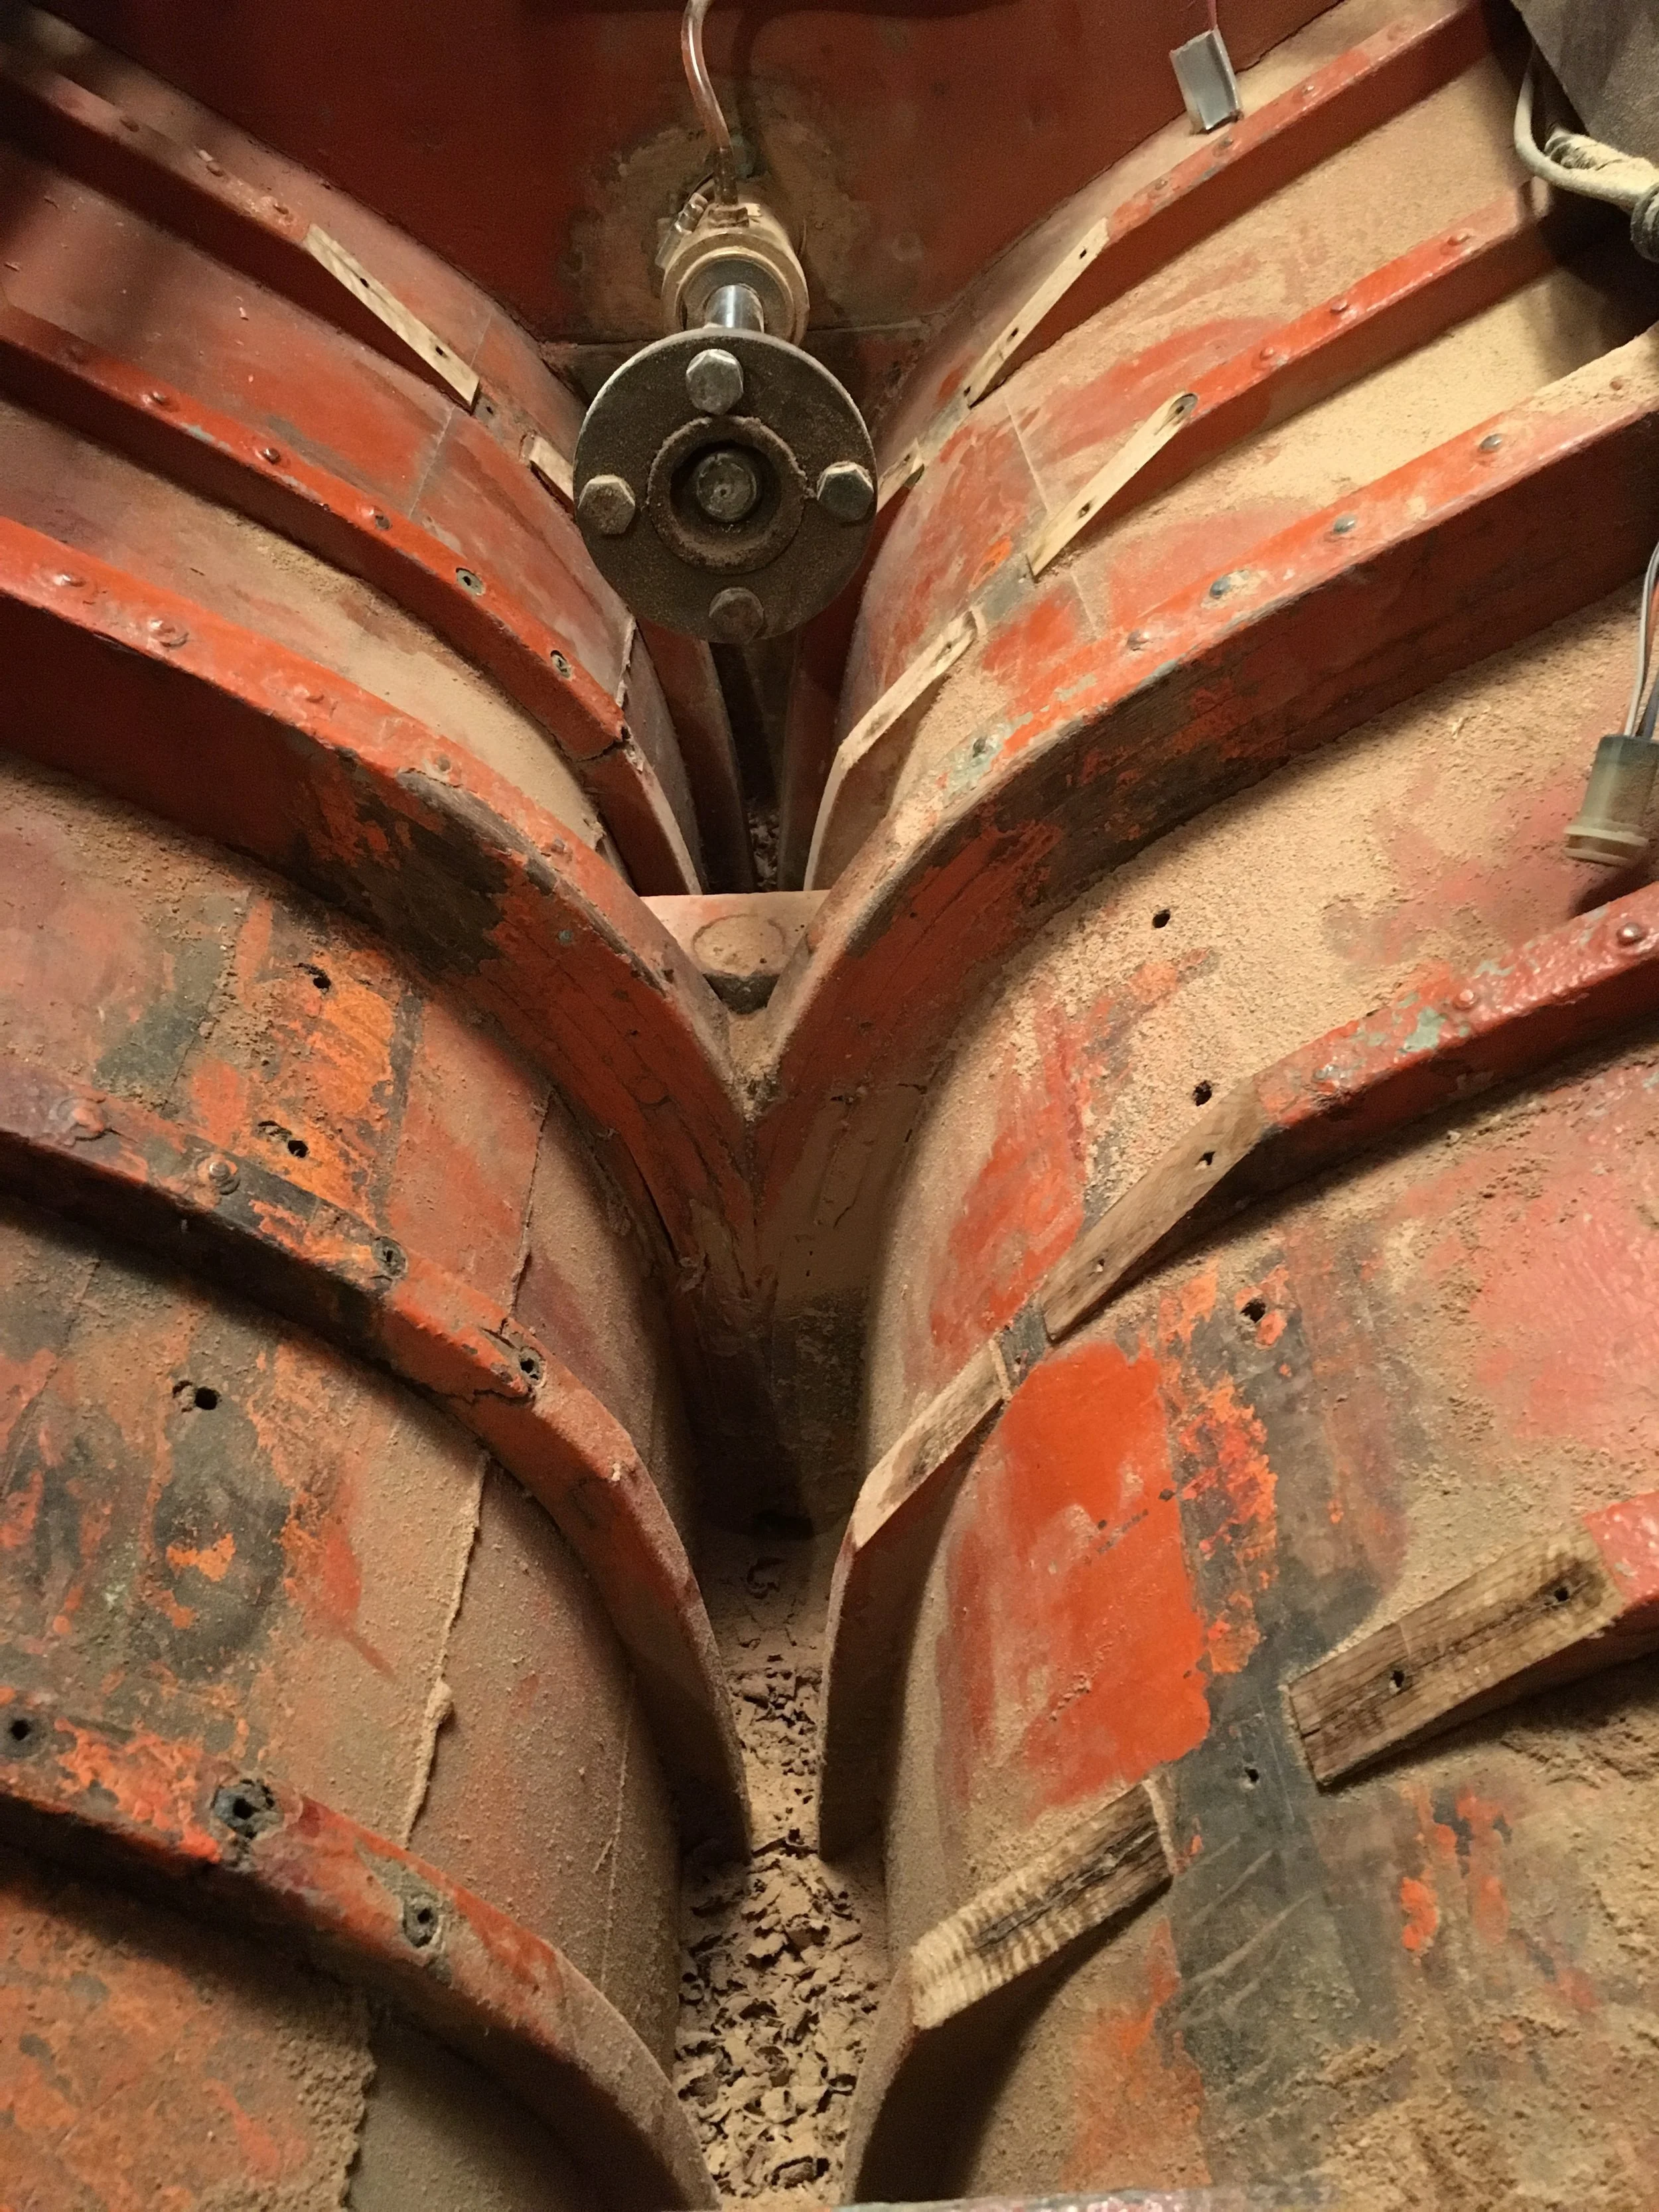
This place is a curse to work in: not only there are still things in a way - propeller shaft, mountings for water cooling etc - it is also very narrow there so I work in very awkward position with limited access for tools.

The first step is to remove affected rivets and their neighbours. Some measurements in relation to existing holes (engine bed) are needed to later find the plugs on the outside. Once there I scrap the paint to localise the plug. It takes long time to cleanly remove the plug - and not to damage surrounding wood. Most of the time it goes well but mishaps happen.

IMG_6139.JPG

Angle grinder removes rivet heads on the inside and then I can back the rivet with a hammer and a punch spike. To prevent enlarging the rivet hole I used then a nail which has smaller diameter than existing hole.
This has a drawback thou - in one case I missed the rivet and the nail went into the plank and through the hull. I need to repair it with small wooden plug and glue. Probably polyurethane as epoxy might fail there (I need to do some reading on it first).

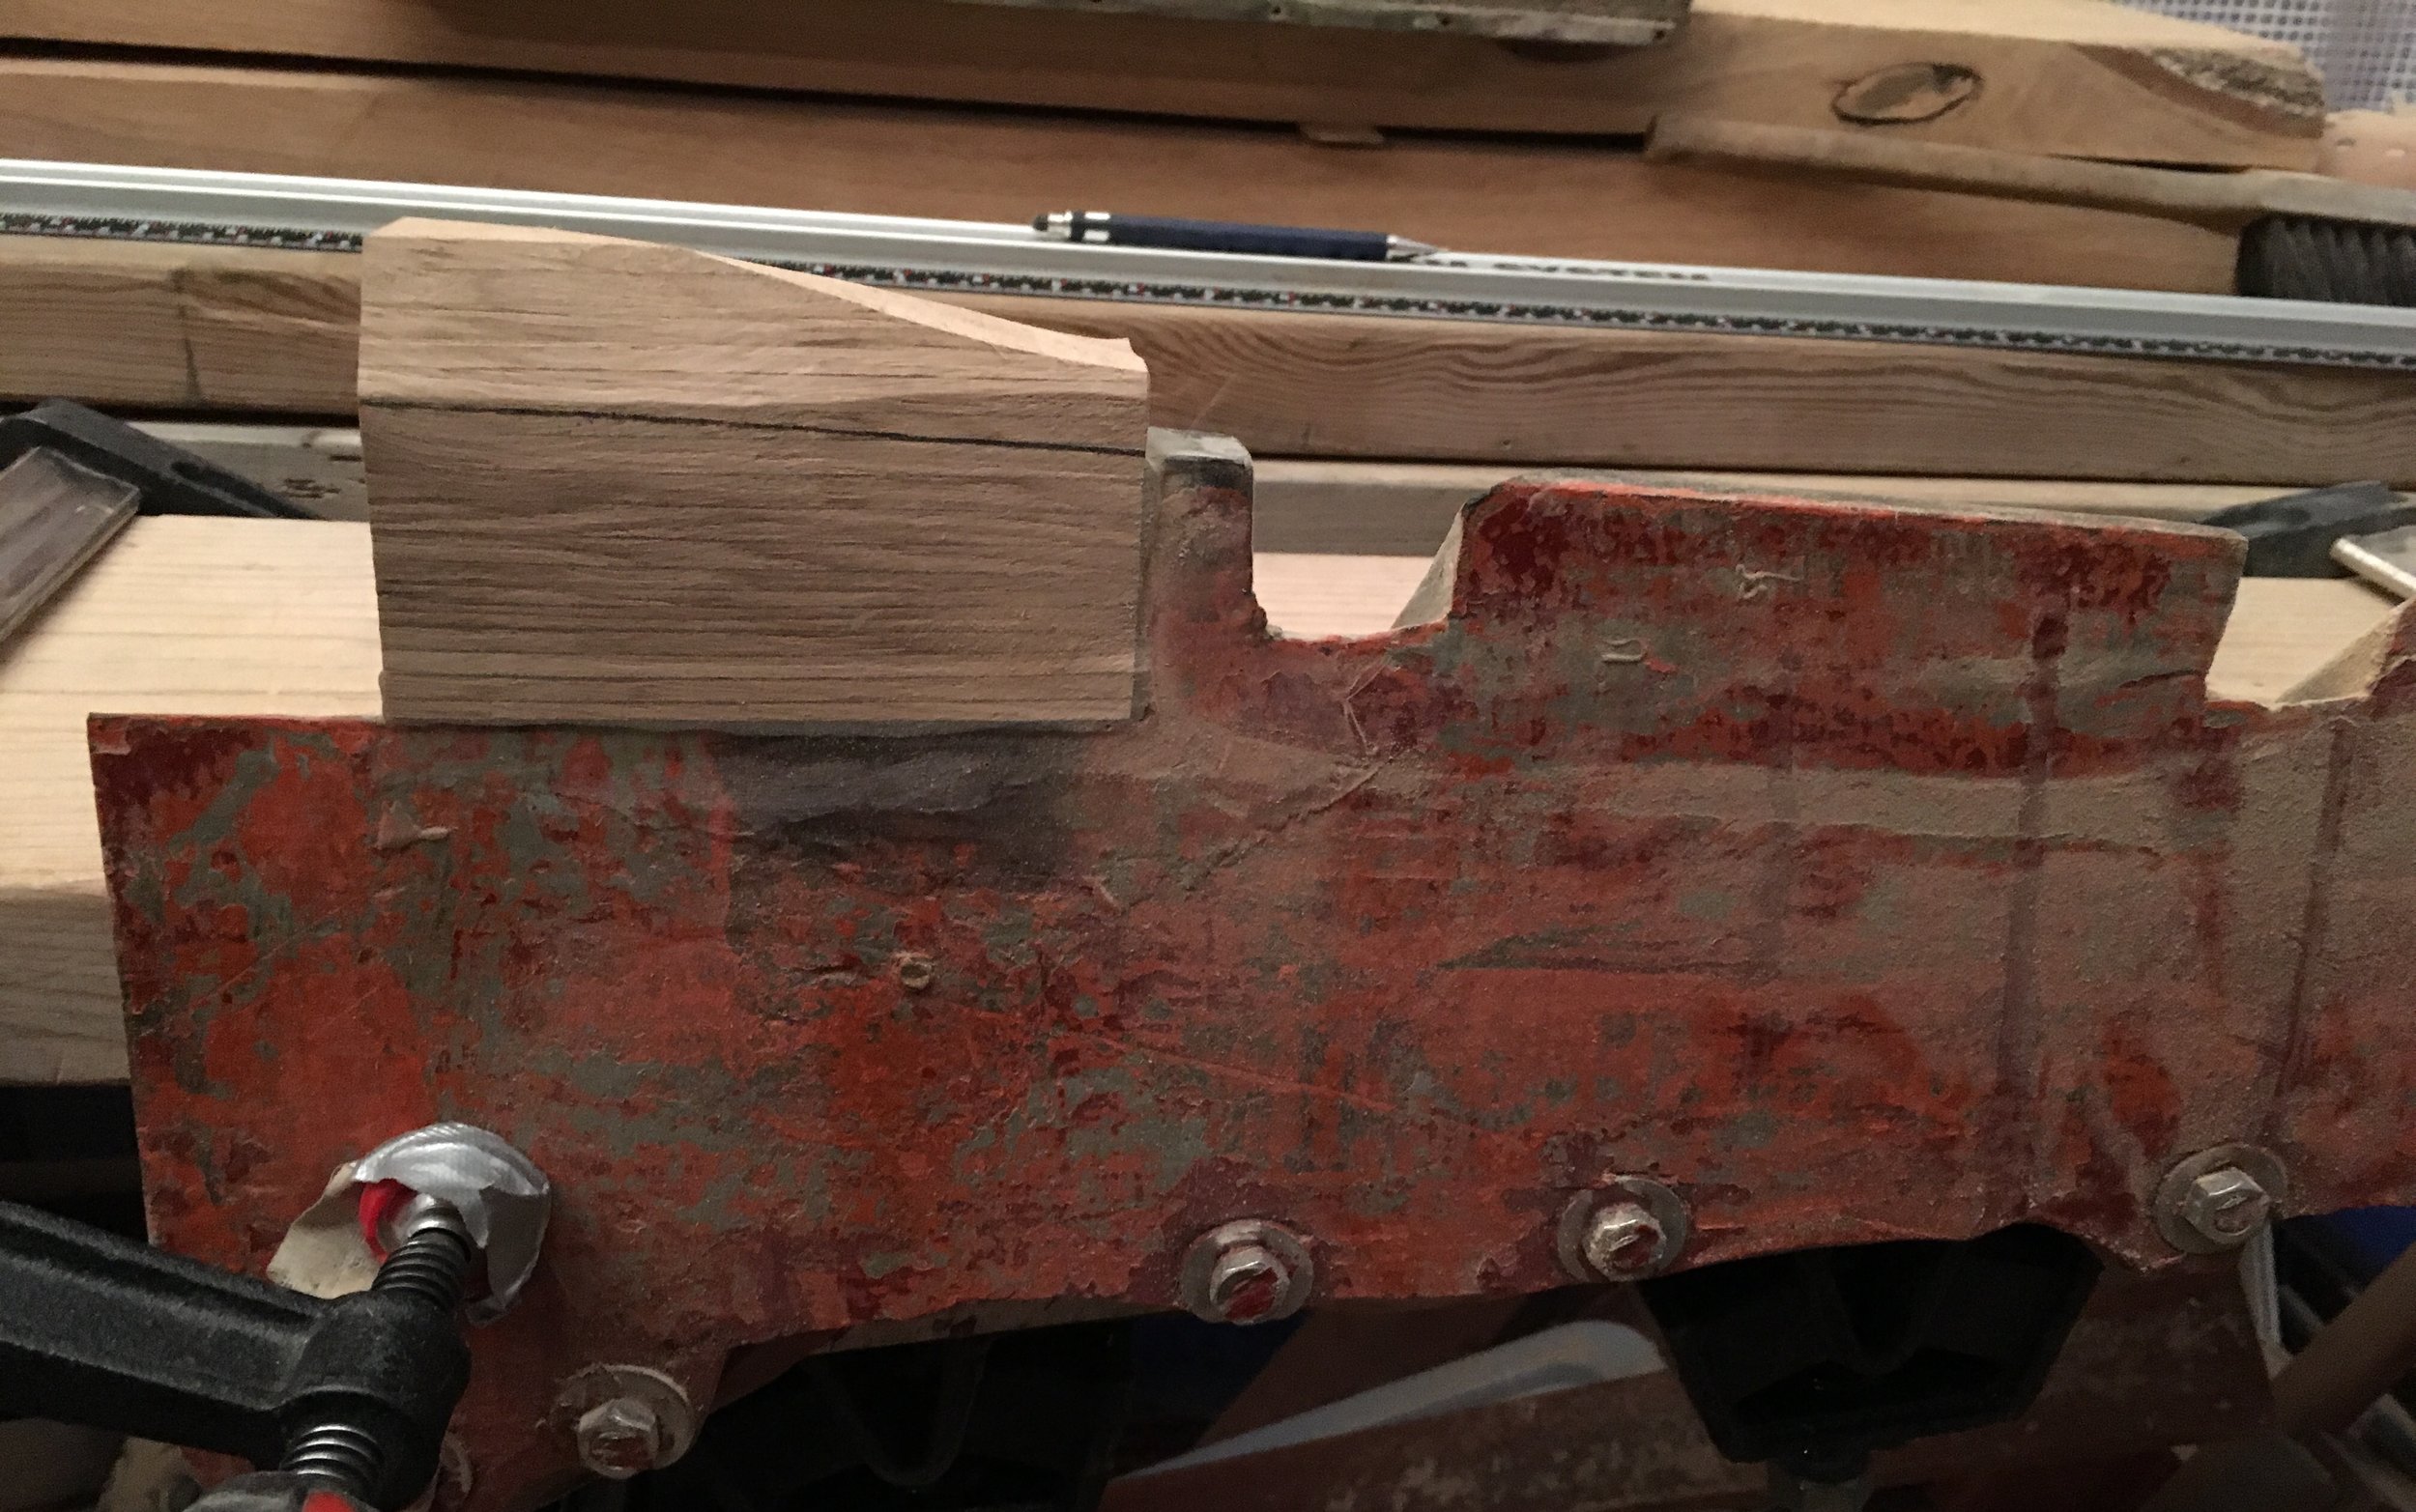
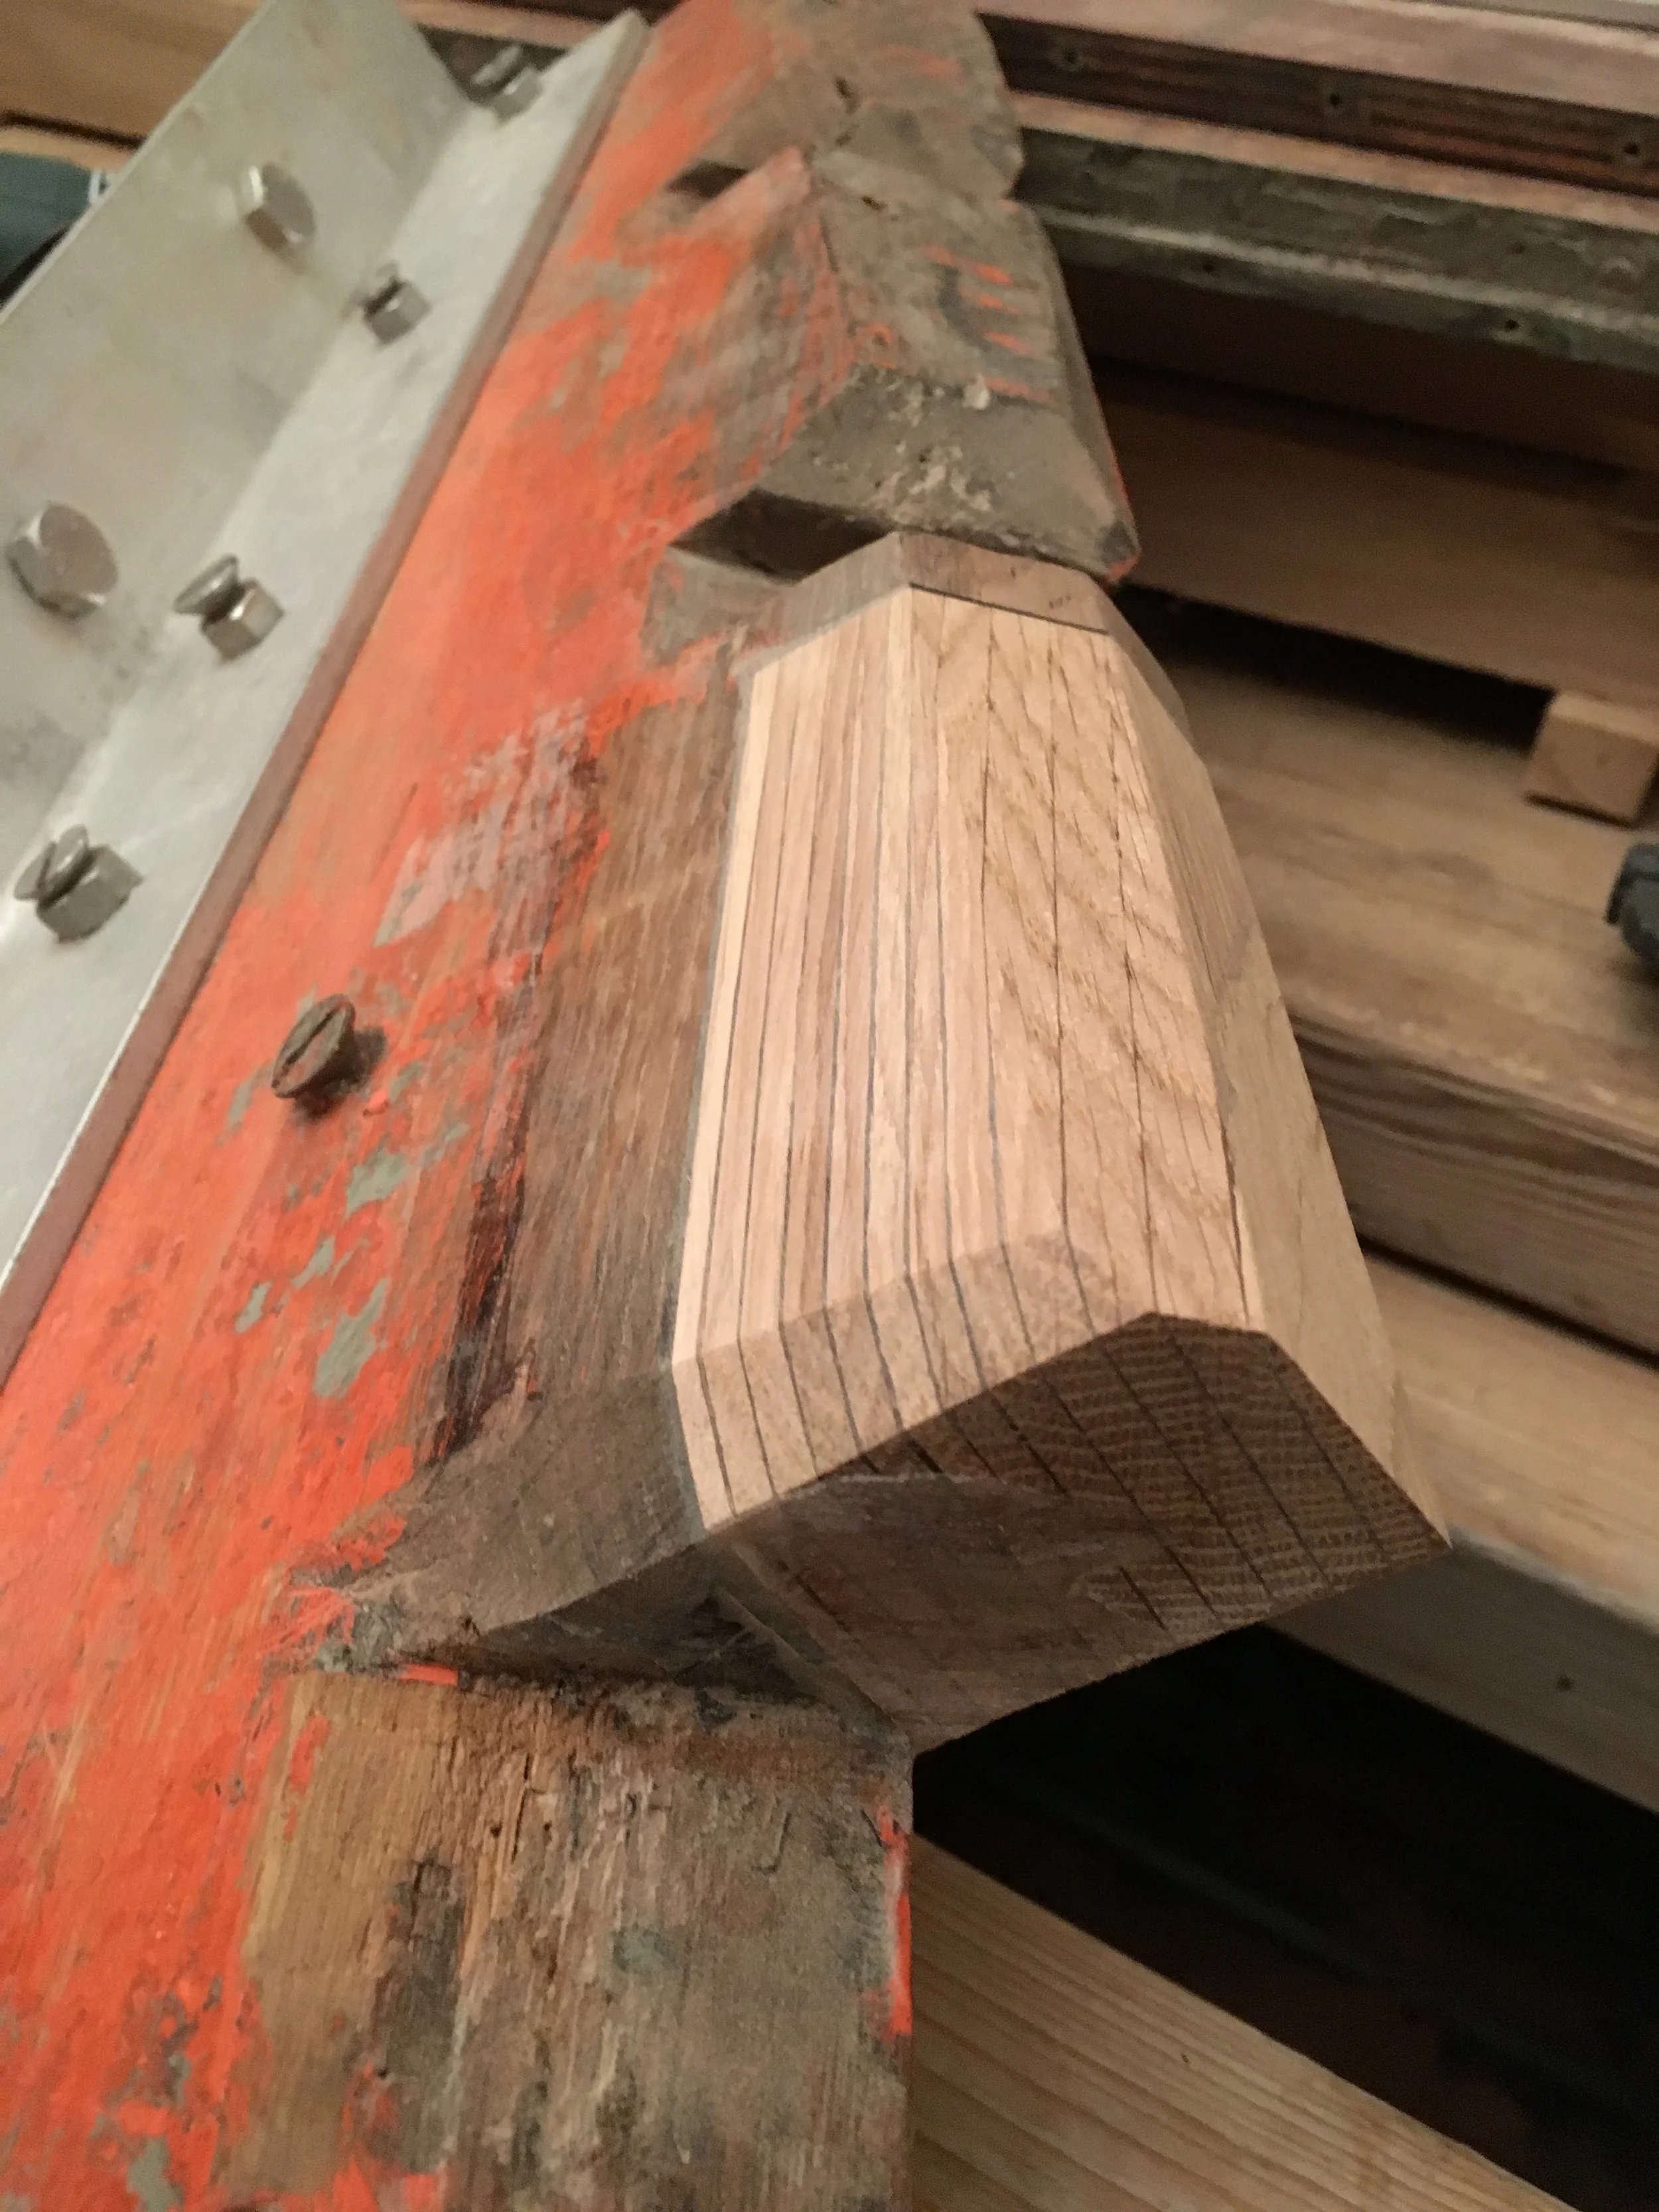
Then, with angle grinder and 40-grid disk I remove the bulk of affected frame to form a flat surface, spanning between both parts of repaired frame. Final shaping and truing is done with a block plane - the only tool which can fit there - hardly!

So far I’ve prepared five out of eight scarfs.

IMG_6141.JPG

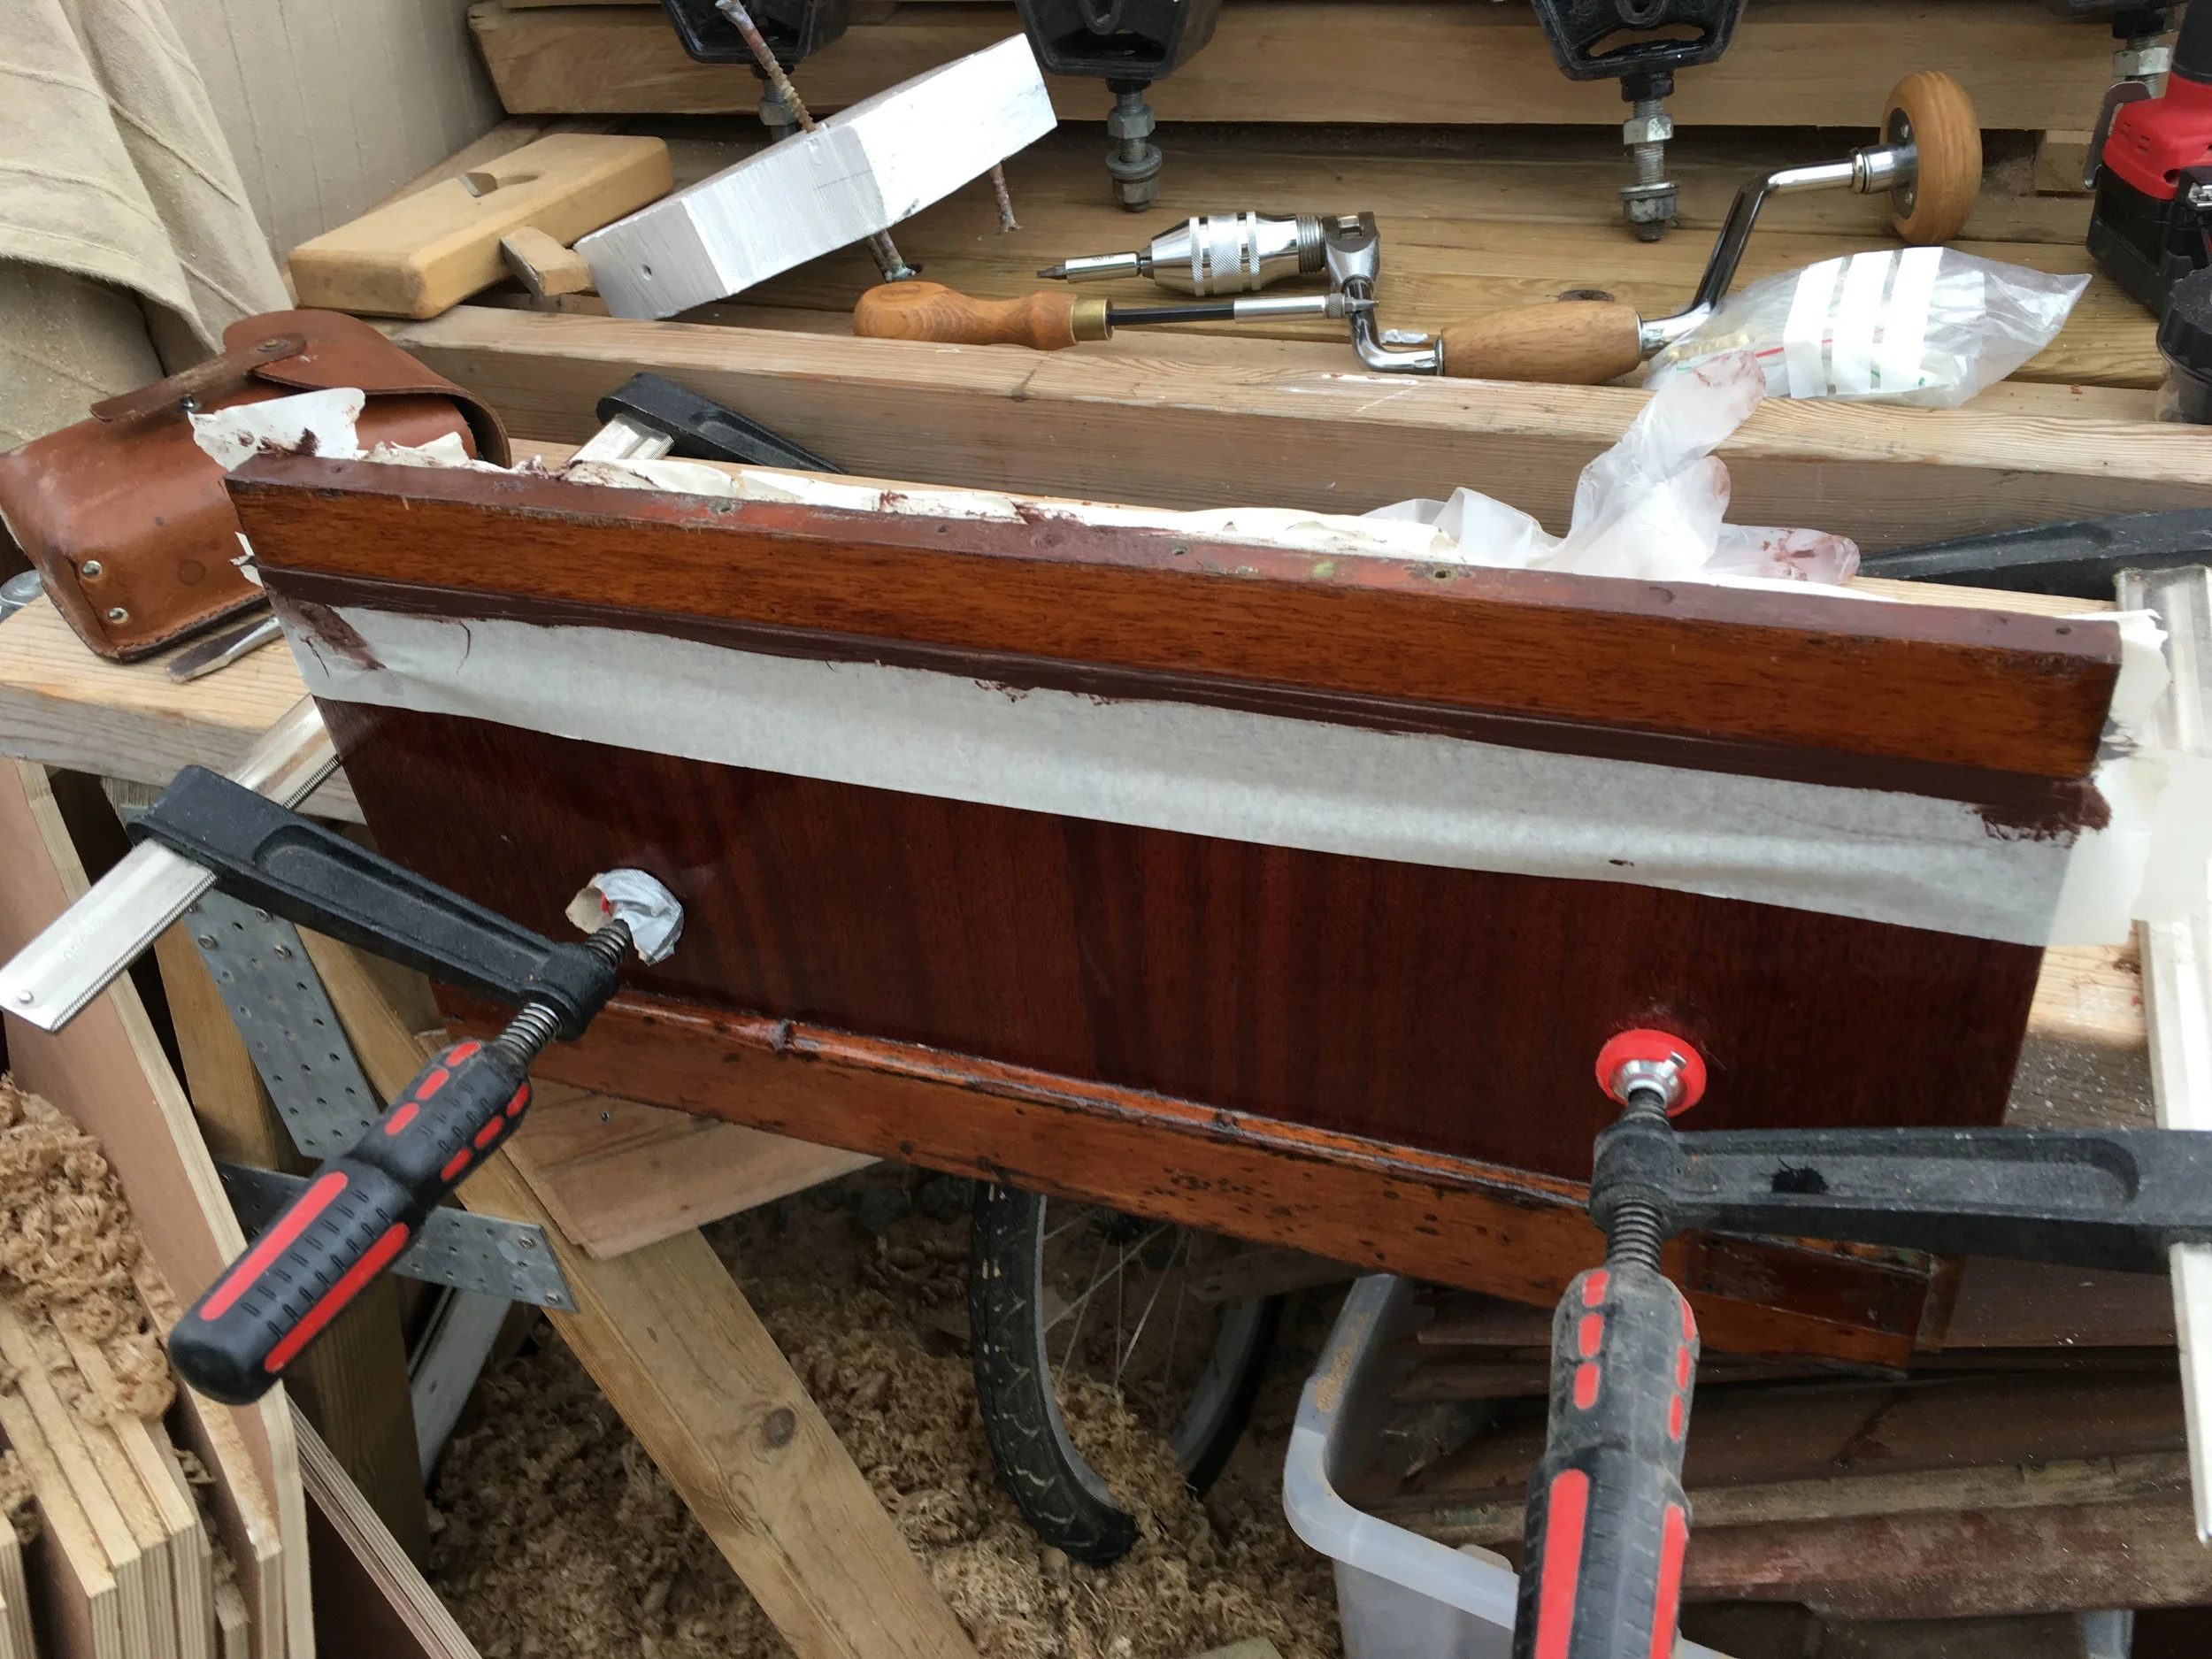
Quarter-sawn oak pieces will be glued onto scarfs. To prevent from gluing them also to freeboard planks I will put thin strips of oak in between scarfs. These pieces will be attached with stainless staples, to hold them in place before gluing and they will be generously bedded in Farm, to prevent water going under the frame. The challenge here is to squeeze the bedding also under scarfs - since rivets are now gone these parts rise a little and I’m afraid of gaps which might be left there after gluing replacements.

It is still too cold to use epoxy: GFlex has lowest working temperature 4 degrees. While it is 5 or 6 degrees outside the boat is still in winter sleep with hull temperature just above zero.

IR.jpg

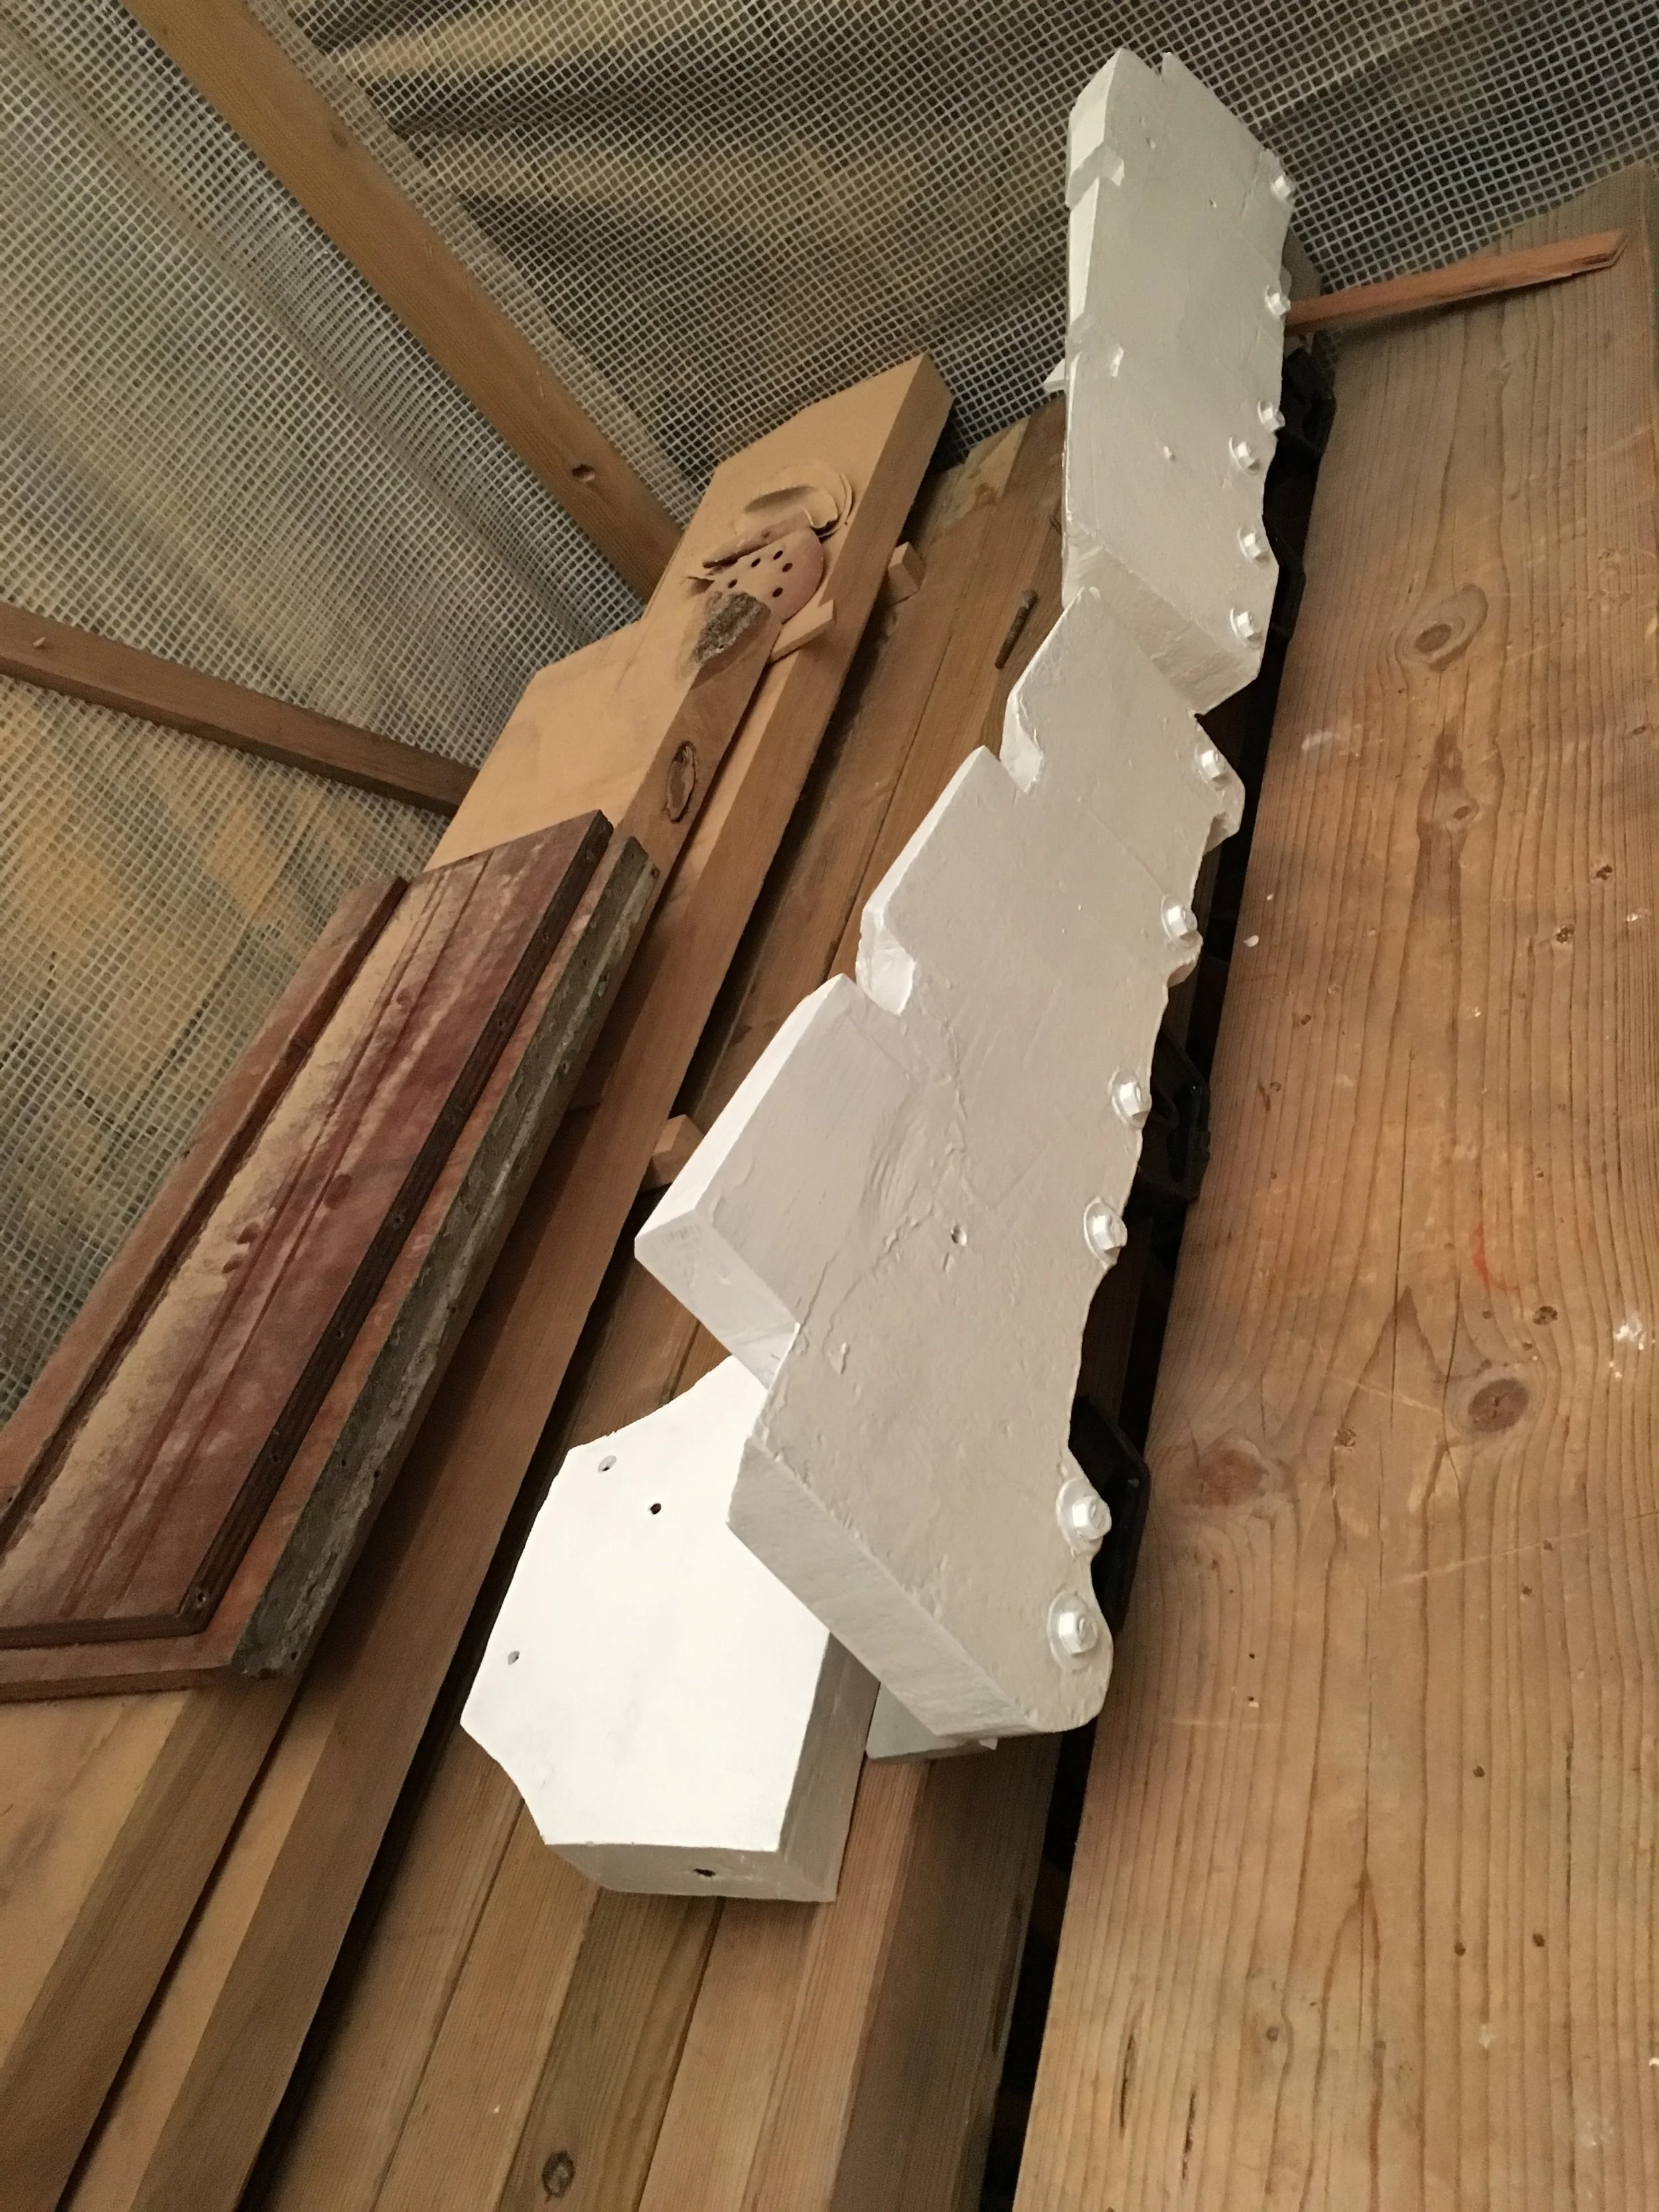
While preparing replacement wood blocks for frames I took care to have a proper grain alignment: annual rings should be parallel to rivets while medullary rays should be opposed by rivets. It seems that one who was framing my boat did not follow that - it might be the source of problems I now face.

For comparison there are five pieces cut away from the big laminated frame (which broke) originally on Meritaten. On the bottom is a sample piece of quarter sawn oak showing already checking along medullary rays. If rivets go along the rays they augment this checking and the frame splits.

FullSizeRender.jpg

To get some rest from yoga in the tight bilge I switched to finishing attaching the new floor timber. Originally there were thick and long rivets which connected the thick frame and the floor timber. I could not get copper nails of that size so I decided to substitute them with silicon-bronze threaded rods. For rivet-like fit I drilled holes of diameter equal to internal diameter of the thread. This way the rod is screwed into wood and tight fit is perfect. In two cases I felt that wood in the old frame is too soft to my taste so I drilled wider hole and installed thicker rod, to get again the tight fit.

IMG_6137.JPG

The whole idea is that all fasteners should work at the same time under load, yielding joint’s maximum strength. That’s why it is a mistake to mix screws and rivets in the same joint: screws having less tight fit than rivets will start taking load only after rivets are already deforming. This makes the joint weak.

To prepare the laminated frame for gluing I drilled small through-holes for M4 threaded rod. This size is smaller than final rivets for these joints so I can use the old holes in planking.

I was lucky that I had a possibility to clamp in this area - opposite berth served as a clamp support so this job was fairly easy for just one person.

IMG_6134.JPG

Wooden washers and M4 nuts hold the frame in place.

View fullsize IMG_6135.JPG
View fullsize IMG_6138.JPG

I don’t have such luxury in the engine compartment - no place there to hold the clamp - so I’ll need some help to hold the replacement blocks while I drill from the outside.

IMG_6136.JPG
April 14, 2019 /Lukasz Kumanowski
Comment
IMG_6128.jpg

Poor-man's lathe

April 13, 2019 by Lukasz Kumanowski

It’s been a while since I’m thinking about building or buying a lathe for my workshop, to turn wood.

Recently I stumbled upon a problem which this tool can solve:
wooden plugs, for closing screw or rivet opening in boat’s planks are 13mm on Meritaten.
Plugs which I have are 15mm diameter.

I could widen openings on planks from 13 to 15mm, with modified spade drill, but I don’t feel good about it: that inevitably weakens the structure. Instead I want to turn the plugs into a proper size.

Since it does not take much time I tried to build my own lathe. The most important part is a chuck. to position accurately the part to be turned. I wanted to use my drill as an engine so I needed something which can be held in drill’s chuck.

Thick block of wood with 3 nuts glued on perimeter, aligned to meet in the centre, is all I needed. Thickened epoxy would hold them good enough for such light turning.

IMG_6127.JPG

Big nut in the centre is for aligning three peripheral nuts. It is placed in routed cutout which will be used for drilling the axis later.

After careful alignment I removed the big nut and added more thickened epoxy to anchor three nuts to the wood.

IMG_6129.JPG

The thing solidified overnight so I could give it a try.

First thing was to cut screw heads as they were too high. I should have used plungers here but had none at hand so that was a quick fix. Then I could calibrate it - to find a position for all three screws to meet exactly in the middle.

IMG_6131.JPG

By counting turns on each screw I opened the chuck enough to place my wooden plug. Then the whole setup was mounted on a drill. Metal file was used as a grinding platform.

IMG_6132.JPG

The result was, well - not satisfactory. The whole setup is flimsy and takes a lot of time to setup each plug to sit exactly on the axis. Even then the slight off-set makes the final result oval-shaped instead of required circle. In my test 15mm plug was turned into ellipse 13 and 14mm diameter.

So now it is clear why most DIY-selfers, who build the lathe, buy the self-centring chuck on eBay.

I’ll need to re-work my plugs on a proper lathe.

April 13, 2019 /Lukasz Kumanowski
Comment
IMG_6080.JPG

Unpleasant surprises

April 10, 2019 by Lukasz Kumanowski

During cockpit renovation I discovered how mainsail track is anchored to boat structure: with two galvanised steel bolts running from the track down to the bottom of cockpit walls.
Unfortunately, due to age and water seeping through wood, these bolts corroded. Port side was gone to the extent that the bolt fell down onto floor when I touched it…

Quite conveniently my whole cockpit structure is gone so I can fix it now pretty easily. At least I thought so.

Instead of galvanised bolts I intended to use silicon-bronze threaded rod and anchor it in exact same positions as old rods were sitting. To accommodate that I’ve made a special joint in wooden beams so that the bolt and nut will slide into the beam and be nicely hidden in the oak.
Then came a surprise when I attempted drilling a small pilot hole in attachment place on the main sail track - the wood collapsed under the drill and a cloud of rusty iron dust fell down onto the bottom. So much for re-using old anchoring point on the traveller. I’m left with a big hole and void around the rests of mainsail track which used to be embedded in wood there.

I was scratching my head on what to do next. The traveller track is anyway a very ancient solution and quite impractical indeed. I think my boat is the only one in the vicinity which still has this. I was planning to replace it with modern construction somewhere in the future and it appeared to me that this future might just came.

In principle the traveller track is, in my case, a simple C-shape metal bar which hosts sliding cart with block attachment for main sail and two side-stops which can be adjusted to determine where - more or less - the mainsail sheets will be attached after the tack.

IMG_6081.JPG

The problem with this primitive solution is that one cannot adjust the sheets position during the tack. The whole assembly is under big tension on leeward side and trying to release the loaded side-stop is impossible. One needs to tack again (or go to windward) to change the position of side-stop and then tack back. Not smart, especially during gusts when releasing the cart to leeward can save the boat by de-powering the mainsail.
Position adjustments are possible only in 3 pre-defined locations (drilled holes to accept stopping pin, spring-loaded). That’s also far from perfect.
Moreover, the traveller is so short that these adjustments make really minor difference compared to keeping the sheets in the centre position so in practice I rarely used it at all. On my previous boat, a racer, the adjustments were possible anytime and in smooth action.

So I’ve made a decision to upgrade this already now since fixing the existing construction will take time and the result will be anyway unsatisfactory. I’ve ordered a new complete set of traveller, adjusted with smooth action on side blocks with 4:1 purchase ratio.
Meritaten has 28 feet on deck so I ordered a solution scaled up to 32 feet. Nothing too strong ever breaks, as they say in Maine.

While waiting for delivery I’m figuring the way I will anchor this properly to the boat. The old solution was to use steel rods (red on the picture) anchored into cockpit side walls, under the durk.

I imagine that these bolts were anchoring the mainsail track, through the wooden beam, into the cockpit structure.

I cannot re-use the same place on port side as there is a big hole now in the wooden beam. Starboard side looks better but I’m doubtful if the old rod has much strength still to rely on so I need a new anchoring place, possibly better placed to protect it from leakage.
The current solution - with sail track embedded into cockpit benches - has a drawback that it allows water to seep into the wood. This is due to the fact that the traveller is moving and vibrating as it is loaded by the main sail, causing gaps in the sealing goo which should stop rainwater from going into wood. There is no other way to stop it but applying a generous amount of Ettan every season there - and then getting your pants dirty if you sit there during sunny day.

The new traveller will be longer so it will span over the side benches, thus enabling me to place it on top of the wood. I will then have better possibilities to properly secure the track to the boat structure - and the whole assembly can be made water tight more easily.

The plan is then to first repair the hole which is left after the old rod. Than will be dane with mahogany graving piece glued there. Then I will rise the wooden beam by gluing mahogany planks so that it is at the same level as cockpit benches.
On top of that I will then attach - with screws and bedding compound, to enable future replacement - a long and thin mahogany or oak plank, to get a flat and even surface for new mainsail traveller.

Traveller profile will be attached with thru-bolts to wooden beam and cockpit benches. Port and starboard bolts will be long enough to enable attaching loop-nuts from underneath, inside the boat. Similar nuts will be anchored into cockpit side walls or into nearby frames. Then these points will be connected with stainless steel threaded rods (green on the picture above), forming a Rome-screw and thus enabling tensioning the whole assembly.
Once calibrated I will then apply blue Loctite thread glue to stop these nuts from unscrewing upon vibrations.

Anyhow - these joints will have to be checked periodically, especially after heavy sailing so I want to have them accessible, unlike the old solution.

In the mean time I fix other small things:
I have final-shaped and planed to proper thickness the laminated oak frame for replacement. It is now ready for gluing once the temperature allows.

I’ve made a new cabin end-wall, facing the cockpit (the old one was damaged during cockpit structure removal as it was glued).

I’ve decided to keep the old cabin doors and bottom “flap” door so I renovated them with original mahogany pieces, screwed and glued with brown Sika (I will never disassembly them so Sika is in place here).

IMG_6079.JPG

My original plan was to remove them and replace with vertical sliding boards, like on more modern boats. This solution enables using different boards for different conditions:

  • one with mosquito net when we anchor during warm nights and want more ventilation

  • one with big polycarbonate pane for rainy days where more light in the cabin is desired

  • and one of heavy-duty plywood for stormy weather

However - my current doors are so… well: cute!
I want to keep them!

They are characteristic to old boats and they have several advantages: you don’t need to store them because they are always there, hanging on their hinges.
They have ventilation openings and tracks to close and seal ventilation for stormy weather.
The only problem is that they are hard to make 100% water-tight so in case of really shitty weather - with following sea flooding the cockpit - there will be leaks into the cabin and bilge pump will have a work to do.
These conditions, however, are very rarely experienced in the Inner Archipelago so I can live with that. In case I will take her into really open sea I will put rubber seals there so that the doors will be tight.

So now I can move on with the remaining tasks - before the new traveller arrives:

  • repairing the hole in cockpit port bench with graving piece

  • preparing wood for beefing the cross-beam for new traveller

  • cutting scarves on steam-bent frames which are broken, starting from the engine compartment

Then I can start gluing replacements on the broken frames. Right now the winter is back, with snow and sub-zero temperatures. Too cold to work with epoxy but once I have all prepared the gluing should not take long.

Then riveting of all scarves will follow. Once done I can go on with:

  • painting the engine compartment

  • lifting the engine back and connecting all hoses, steering, water cooling etc

  • putting back the new cockpit structure

  • sanding and varnishing the hull

  • fixing dents in the deck (deck renovation is scheduled for next winter)

… and some more smaller tasks which always pop-out.
Then we can book a crane for doping Meritaten in water!

April 10, 2019 /Lukasz Kumanowski
Comment
FullSizeRender-2.jpg

Engine foundation fixed

April 04, 2019 by Lukasz Kumanowski

Last night I glued new piece of laminated oak onto port-side engine foundation. Tonight it was ready to be shaped and painted.

The piece is made from oak laminations - off cut from too long laminated frame.
Initial shaping was done with angle grinder but the final steps were done with plane and chisel - for better control.

IMG_6053.JPG

I scraped all old bedding compound, dirt and loose paint from all components. It turned out that this old piece of oak was painted with lead oxide paint - and it was still in good condition so I’ve left it on the piece.
With bit brace I could finally remove all old, brass screws. I will replace them with bronze or stainless steel. This part is not touching water so stainless should be good enough.

Scraper, wire brush and then thorough cleaning before painting. It’s 0 degrees tonight but this paint - Danboline bilge paint - has no problems with that. Seems that one coat will be enough but I’ll decide after it cures.

IMG_6055.JPG

As often, on my way to the workshop I met few interesting habitants of the woods!

FullSizeRender.jpg
April 04, 2019 /Lukasz Kumanowski
Comment
FullSizeRender.jpg

Lead plug #3

April 02, 2019 by Lukasz Kumanowski

Evening’s visit to the boatyard.
It’s still chilly but the sky is clear with millions of stars. Where my boat is there are no lamps anywhere near - pitch dark - so on such nights one can really enjoy watching the sky.

Tonight’s job was to close the third, last keel opening. It went surprisingly smooth - this time I shaped the lead plug much better so hammering went easier and I was not forced to bang it for long. As before the nuts and keel bolt, together with the whole pocket were covered with bedding compound. Then followed lead plug.

IMG_6047.JPG

Melting with flame, banging, melting again, banging - it’s a routine now. Finally the plug was in place and I’m left with circa 2-3 kg of lead from all 3 plugs. Not bad.

I cleaned all 3 plugs and their vicinity with wire brush and MAPP torch, to remove as much oxidation as possible. Then followed first layer of mönja - red paint, iron oxide in linseed oil. Traditional way.

Unfortunately my ballast keel was covered with epoxy - and the job was unsuccessful in many places so epoxy is lifting due to continued surface corrosion of the iron. Not a big deal for me - Meritaten is not a racing boat - but at some point I will have to sand blast the whole ballast and protect it again with something. Probably järnmönja this time - the old way.

It’s a sign of our times - we want to make things quicker to save time. And yet we have less time than our grandfathers, in my opinion. That’s probably due to the fact that we want to do too much with our time - too many activities, TV, Internet etc. So modern paints are composed to dry quicker but they are more expensive than old ways - and often the result is the same or sometimes worse. Järnmönja takes time to cure - linseed oil needs to oxides which takes time. But it is very cheap and contains no hazardous chemicals. It’s also easy to apply. Why do we use other methods? Because they are quicker! But they cause their own set of problems - time and money-wise costly problems.

So on Meritaten I chose to go the old way, as much as it is practical. Partially because I’m not in a hurry and also because I want to see how these things worked. That does not mean that I don’t use wonders of XXI century, like epoxy or bedding compounds - I do. But only in applications which, in my opinion, benefit from them. Primer paint is not one of them - I think traditional paint does a better job. It just takes more time.

IMG_6048.JPG

So this part is done.
I can move now back to the bilge to fix broken frames.
And repair the cockpit.
And repair the engine foundations.
And refresh the engine room.
And…

April 02, 2019 /Lukasz Kumanowski
Comment
  • Newer
  • Older

Powered by Squarespace