Boatworks

  • Main
  • Louve
  • Typewriters
  • Workshop
  • Meritaten
  • Glypto
  • Motoko
  • Inspirations
  • About
IMG_5088.JPG

Metan-Ettan. Fixing leaking portlights

November 03, 2018 by Lukasz Kumanowski

During the first winter after I bought Meritaten I was struggling to remove portlights’ frames - to clean them from old chrome and to properly varnish wood under them.

The struggle was due to used sealant - polysulphide, in this case brown Sika. This thing has its place on any boat but one needs to remember that not only is it a sealer - it is also a decent glue!

Putting Sika under anything which needs to be periodically removed for maintenance is asking for trouble. Especially on wooden boat.
This devil is holding so strong that you may tear it out together with wood underneath.

It was then that I sworn to myself to never use it under any metal-to-wood interface on my boat.

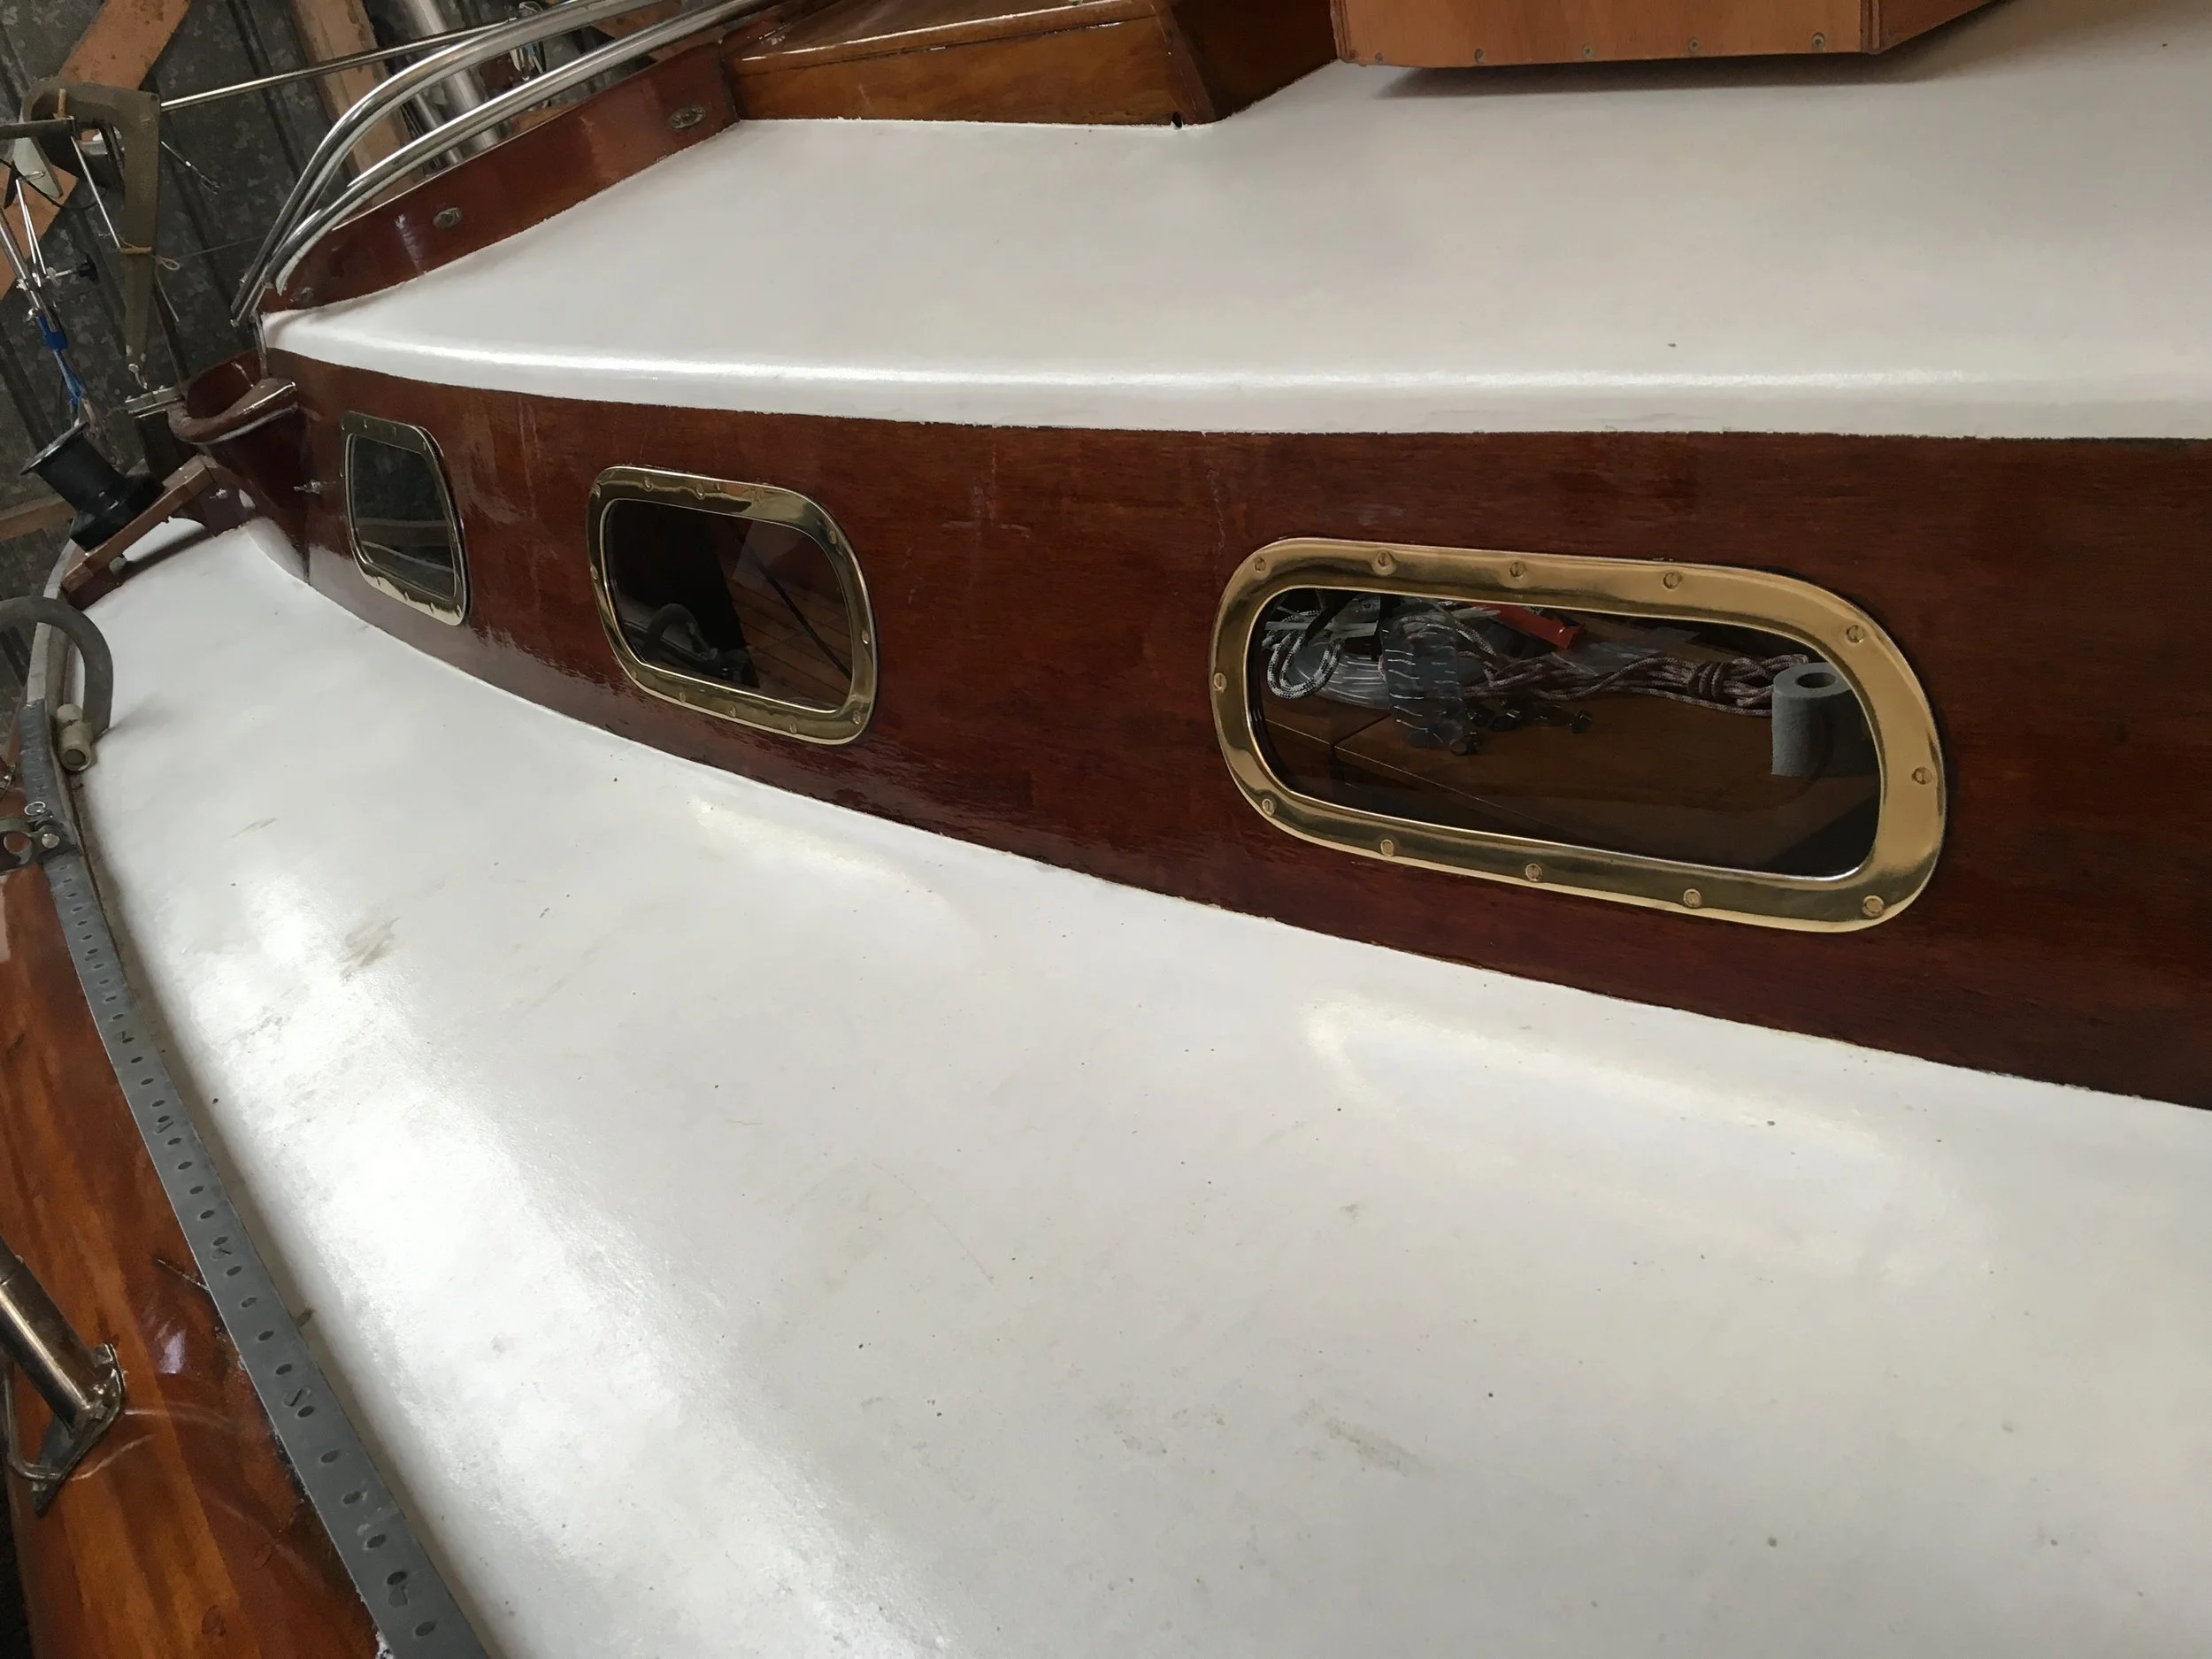
All deck and cabin metal accessories need to be removed during boat maintenance. Some of them yearly (like portlights), some of them less often.

Due to very different thermal properties of metals and wood one needs to seal the interface between them. Best if the seal is also acting as isolation. The thing is that due to temperature changes there will be condensation under the metal which, if trapped, will then slowly deteriorate wood underneath.

My predecessor in Meritaten’s history had glued portlights with Sika, in hope that he will never again will have to remove them.
Wrong!
Moreover - since wood screws holding brass frames to the cabin were not doing their job, it was really only Sika which held the assembly together. Screws had no holding power to strongly pull the metal frames towards the wood.
I don’t like that: not seaworthy at all.

Even though polysulphides are almost ideal moisture barrier the evil properties of water enable it to creep under anyhow. It’s just a matter of time.
Not a big deal if you notice that as a leaking portlight - then you know it’s there and leak needs to be fixed.
Worse if the place cannot be inspected - water then does its job constantly for years, slowly turning wood into pulp and rot.

Off went Sika (sharp knife!) and, after varnishing, I’ve sealed the interface with Ettan.
Now - Ettan is a name of the product which is local to Scandinavia. It’s a mixture of bee wax, pine tar, linseed oil and… that’s it.
It smells smoke and is used to seal small leaks. It’s also used as a wooden boat perfume, giving it a scent of nostalgia.
Apart from smell, the nice thing about Ettan is that it is constantly sticky, never dries out, it’s natural and can be re-used countless of times. Just scrap it from the surface, melt with hot air and you can use it again. It can also be easily cleaned anytime with turpentine.

Try that with Sika - nope!
The only way here is to cut it and them mechanically remove.
Ugly job.

The only disadvantage of Ettan is that it melts on sunny day. Like bee wax.
If used above waterline, in exposed areas, it will melt.
If it is confined in a cavity - no big deal, it will solidify at night, filling the cavity even more tight and repelling water even better. Tar present in the mixture is rot inhibitor.

However - if there is a possibility to leak outside - it will.
That has happened under my portlights, resulting in voids under the brass frames and causing leaks which I was fixing constantly during last, extremely hot summer.
I’ve changed old screws to new, longer brass screws. They held a bit better but still not enough to force all parts to fit nicely.

Now came the time to fix that better. Sika again? No, not yet.
I’ll try a combo of Ettan and rubber gasket.

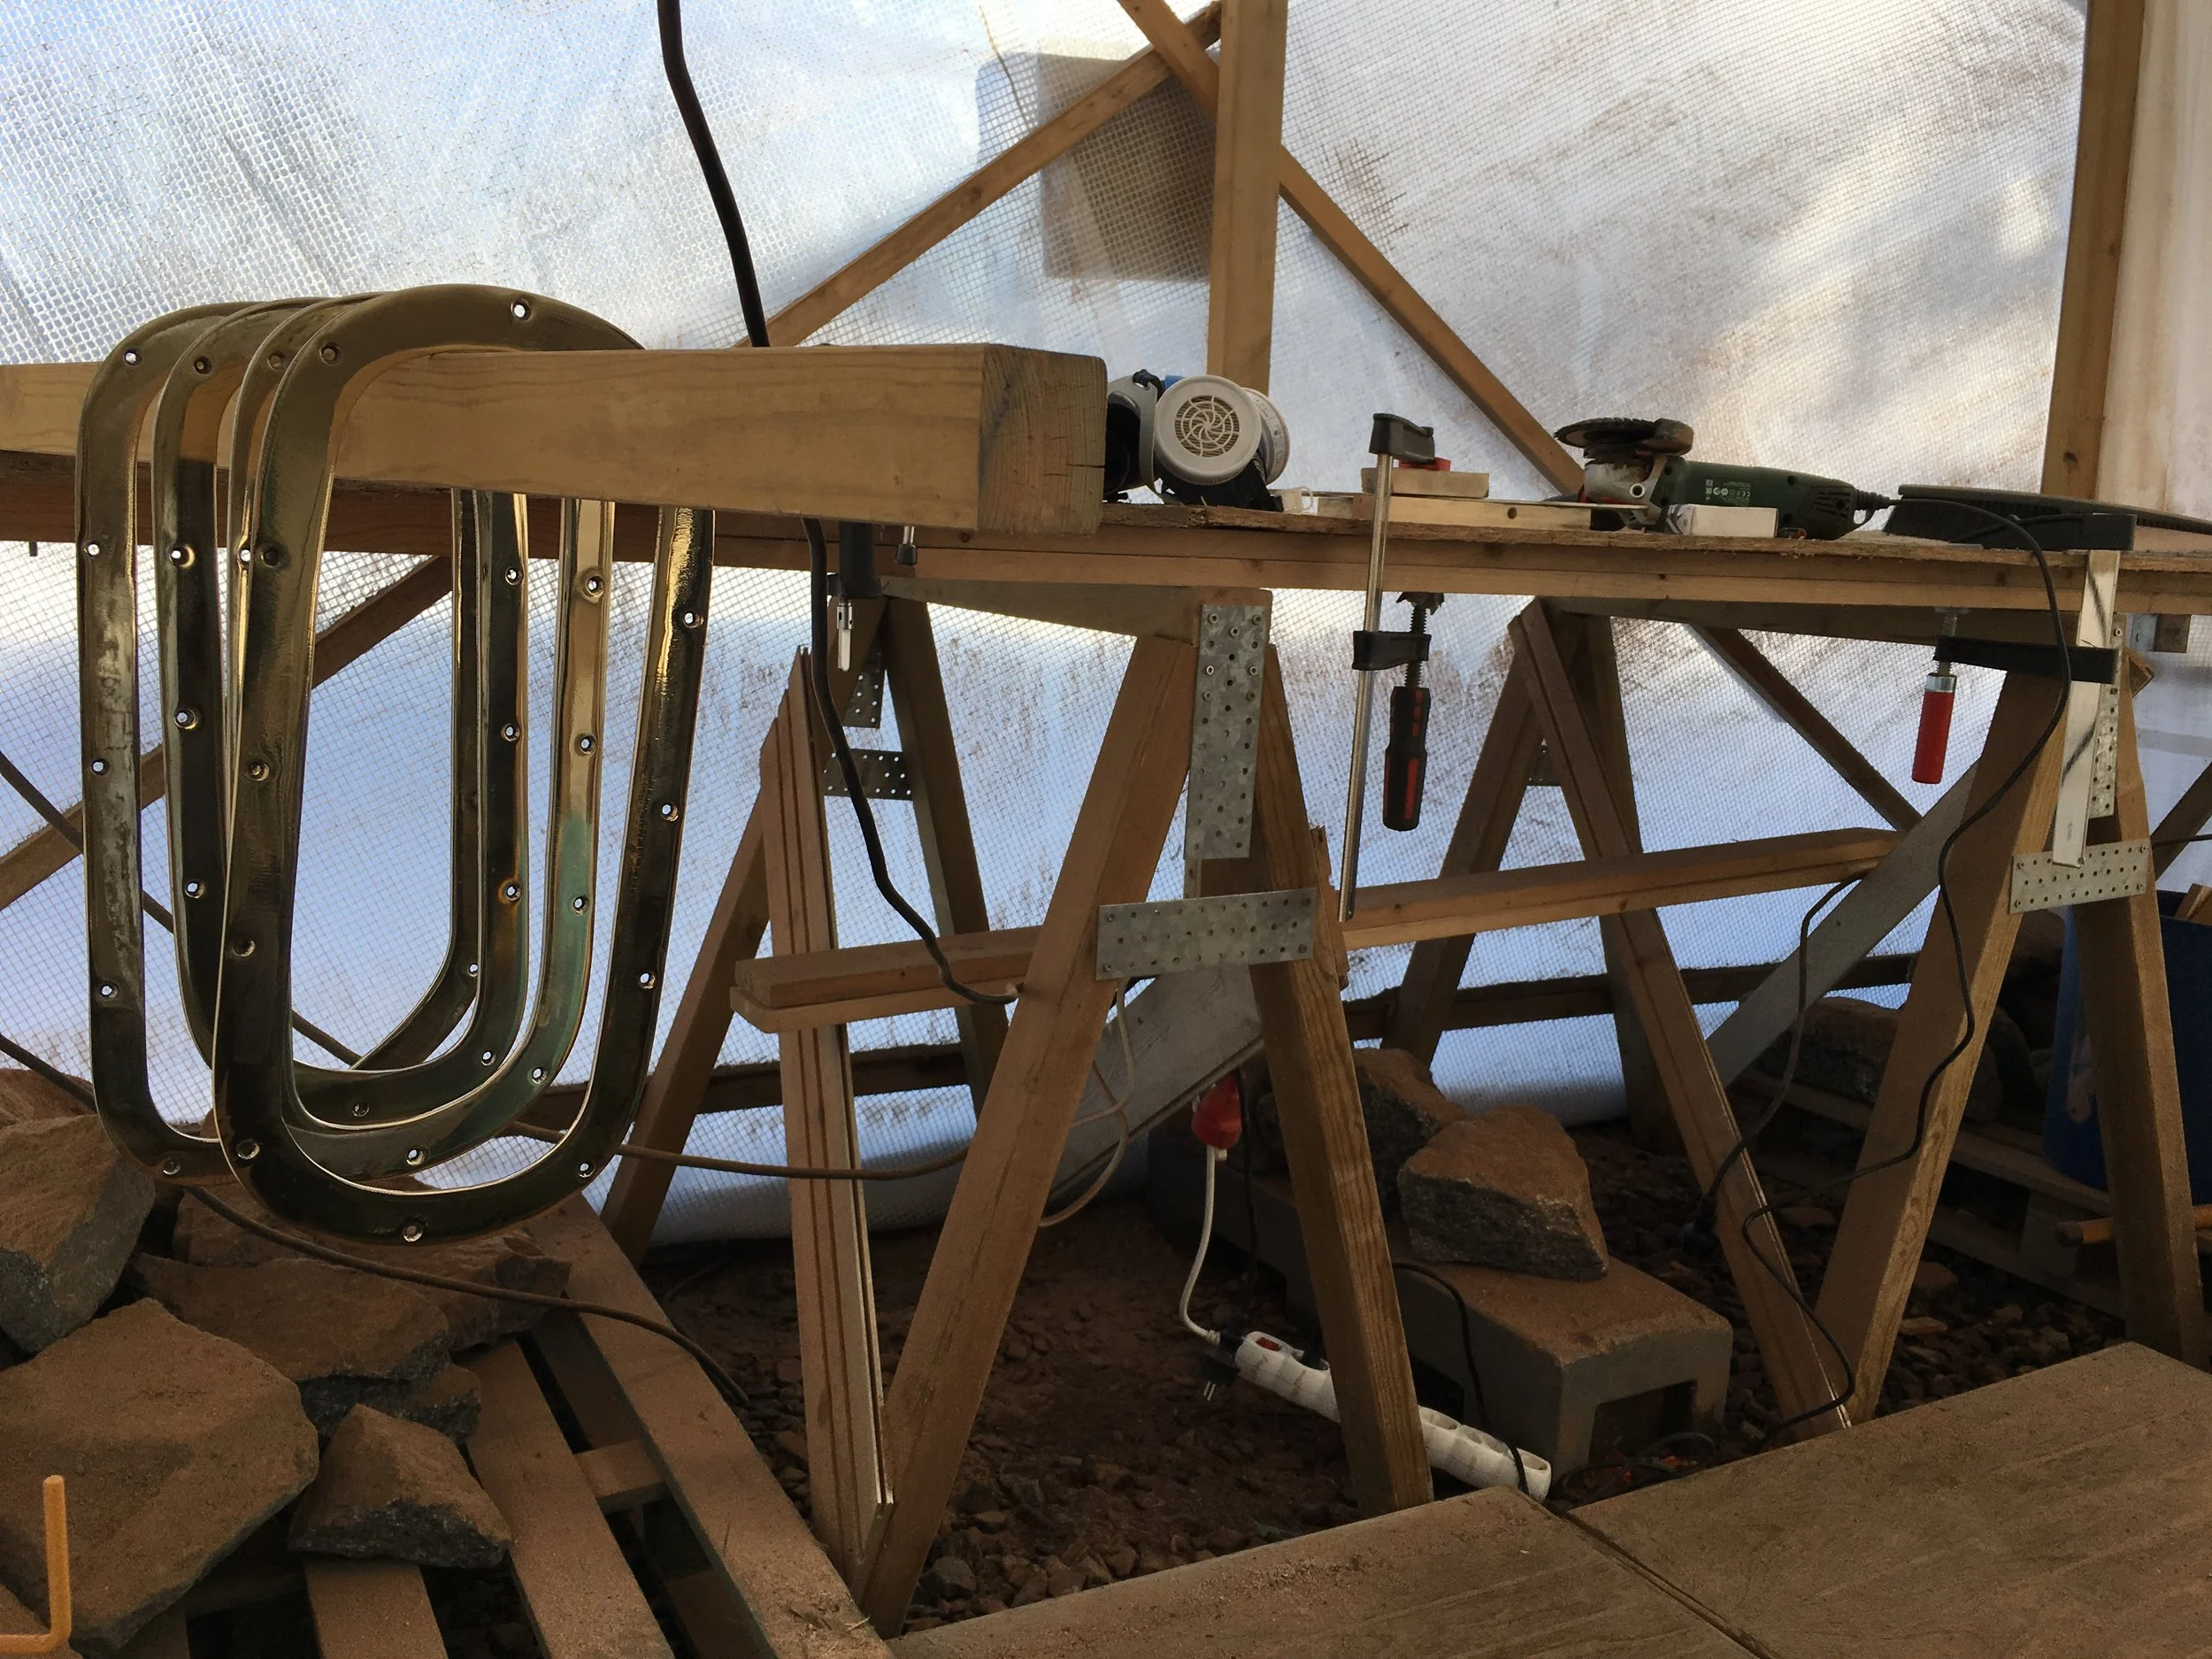
I’ve cut out 1mm rubber gaskets for each portlight frame. Pre-drilled the rubber to accommodate new, M4 machine screws which will go all the way through cabin sides.

My theory now is that Ettan deployed on the wood and around glass (plastic in fact) will seal the wood and prevent condensation to build on top of it. Rubber gasket on top of that, held tight with metal frame and thru-screws will prevent Ettan from leaking out during hot days.
And if I spot a leak I can first try tightening the screws to compress the gasket, hopefully sealing the assembly.
To be proved next summer.

So today I’ve cleaned roughly rests of the last year’s applied Ettan and re-applied it again, sealing the wood. Then went assembly of rubber and metal, tightened firmly with screws.
On the inside I’ve used closed nuts to match the interior and not spoil aesthetics with exposed threads.
I think it turned out very nicely.
We’ll see if it works as expected but at least it is now seaworthy.

Interior before drilling thru-holes for M4 screws

After portlight frames removal - most of Ettan is gone, exposing voids waiting for rain water

After portlight frames removal - most of Ettan is gone, exposing voids waiting for rain water

Re-applying Ettan

Re-applying Ettan

Half-way sealed. It’s a messy job but smell is good!  Hot-air gun helps keeping Ettan in workable consistence.

Half-way sealed. It’s a messy job but smell is good!
Hot-air gun helps keeping Ettan in workable consistence.

IMG_5120.JPG
Brass washers and closed nuts on the inside. Matching nicely with copper-riveted frames

Brass washers and closed nuts on the inside. Matching nicely with copper-riveted frames

Top
November 03, 2018 /Lukasz Kumanowski
Comment
IMG_4039.JPG

Yanmar-san is wounded

May 06, 2018 by Lukasz Kumanowski

When motorsailing through narrow and long passage from my winter harbour I had this thought: it would be really bad if something happened to the engine now!
I had wind directly into my nose, it was very narrow, with stones on the port side and coast on startboard. And I was alone.

Guess what, it happened. Exactly after I had this thought I heard engine alarm - oil !

Shit!

Anchor was ready to deploy but I’ve decided to fight. Off with engine, up with mainsail and genua. It took a minute and I had regained control over the boat. But then it took 2 hours to get myself out of this narrow channel with wind directly ahead. You see, Meritaten is not Skärgårdskryssare or Safir, her minimal pointing angle is around 60 degrees to wind so going up wind is time consuming. But we’ve managed.

After leaving the channel I could finally lace the rudder and go under deck to see what happened. Checking the bilge - shit! Oil in the bilge!

Before I could deploy oil-soaking raggs Meritaten’s automatic bilge pump engaged and spitted out most of it. Nice… I’ve switched off the pump and contained most of the spill in raggs. But I realised that I have no engine right now.

As much as I don’t like inboard engines they are really handy when entering or leaving harbours. When sailing in Poland, on lakes, we didn’t have any engine and we were sailing in and out on sails. Like most other sailors at that time. But our center-board boats displaced only 600 - 800kg. Meritaten has over 4 tons.

Well, no worries, as long as wind is not directly from behind it is manageable. We’ll see when we arrive.

Six hours later we arrived. And guess what - wind was directly from behind. Nice.

As always, you need to have plan A and contingency plans B and C. My plan A was a classic manoeuvre of going into the harbour with the wind, then turn 180 degrees against it, while turning drop the main and roll genua and using boats inertia turn back and enter the harbour with reduced speed. The trick is that you can reduce your speed too much - loosing ability to steer - or not enough - and entering tight harbour too fast.

So you need plan B and C. Mine B was a storm anchor - heavy Hereshoff anchor which ALWAYS grips. If not - plan C: big fenders and boat hook to doge other boats.

Well, it went pretty smooth, on modified plan A.

While approaching with wind I’ve realised that I have no room to make 180 turn hence risking smashing everything around. So instead I went directly to the wind, dropped the main, jumped back to rudder, turned another 180 degrees and started approaching only on small fock. Observing my speed I was rolling in or out the sail to have enough speed for steerability but slow enough to not damage anything.

Two gentlemen sitting on a boat nearby, upon seeing what I do, jumped onto bridge to assist approach. Being sailors they new instantly that I have no engine - nobody does harbour entering on sails in Sweden these days!

Luckily the assistance was not needed - but highly appreciated. All went smooth as it should.

After finishing with shore lines and tiding the sails I could go down and inspect Yanmar-san.

IMG_4042.JPG

And so I’ve found this.

This pipe is one of 3 oil pipes which run outside of the engine body. This particular one goes directly under salt-water pump which happened to be leaking. And it must have been leaking for some years to corrode the oil pipe to an extend that it simply gave up under pressure.

A nod to previous owner - but also to me, I should have spotted that earlier.

Yanmar 1GM10 engines, like mine, are known for this issue. They are good, reliable engines with only 3 weak points, this one being one of them.

It was a quick fix but I needed to wait a week for spare pipe.

Seems that engineers at Yanmar have finally realised this problem because the new pipe is made of copper. Good! But I will paint it anyway!

May 06, 2018 /Lukasz Kumanowski
Comment

Into the sea again!

April 30, 2018 by Lukasz Kumanowski

I was working very intensive for the last months to finish all needed repair and be able to put Meritaten into water by the beginning of May. The longer one waits into spring the harder it becomes - spring air is dry and wood starts to be affected ny that, leading to more leaks and longer time the boat needs to be supervised with pumps etc.

Finally the day has come - I was ready. I agreed with Anders that I’ll take a day off from work to be on place when we put her into water. Anders was afraid if she will not leak like sieve.

That was my first time with Meritaten so I was surprised and scared hearing that. Nobody told me when I bought her!

IMG_3956.JPG


It turned out well. Anders and Peter were surprised - she leaked almost noll. Well, for a wooden boat. The pump started automatically after 2 hours so it was around 2l per hour. Nothing.

Seems that my work with putting linseed oil all over the bottom in autumn has payed itself: the wood was not shrank, saving copper rivets big strain and keeping her tight.

Covering the bottom with plastic “tent“ could have also helped, inhibiting drastic humidity changes and loss.

The whole trick with wooden boats is to keep their humidity level constant. This prohibits wood swelling thus keeping the hull tight, saving fastenings (rivets in my case) and making varnish last longer.

Americans keep their boats in water during winter. Here, in Sweden, almos nobody does that. Partly because we want to work on our boats, keeping them in shape, partly because we are afraid of ice and frost damage, especially to tropical hardwood like mahogny.

But that puts a rigour of shielding the hull from drying out. We accomplish it by oiling the bottom, storing boats well covered and by putting them back to sea as soon as ice is gone.

IMG_3959.JPG


Since my boat was the first to be sliped - with no queue of other boats waiting - I could leave her in the slip for a few days, just in case some sudden leak would come.

IMG_3961.JPG

Few days later I could put back the mast and install all rigg.

On coming weekend I will sail her to my summer harbour!

IMG_4001.JPG
IMG_4003.JPG


April 30, 2018 /Lukasz Kumanowski
Comment
IMG_3933.JPG

Meritaten

March 22, 2018 by Lukasz Kumanowski

After I bought her it took only one night to wake up with her new name.

I didn’t like her current name and there was nothing which would prohibit changing it. After all - I’m little bit superstitious and there are countless tales of boats sinking after their names were changed. Take it with a bit of salt (no pun intended).

There are some points which would prohibit the superstitious mariner from just doping his boat without tedious procedures. Meritaten did not fill any of these points:

  • she did not have a name plate on her

  • no item on or in her was bearing her name

  • current owner (me) did not like the way she was called

Why Meritaten? Go figure, it’s my secret. You can ask Google about Meritaten statue in Carlsberg Glyptotek in Copenhagen. That can give you a hint.

Anyway - when Christer bought her 30 years ago the descending owner took home her name plates. She was called Puh at that time. When she was built she was doped Dove. Very nice name and nicely matching her shapes. Almost like Meritaten.

Well, the place after the name plates was very visible - with different shade of mahogny, dark holes after screws etc. Christer was in pain so Janne (who built her with his father) has fabricated mahogny boards, bent to her shape. They were raw, requiring final shaping and putting lettering.

“Acarina” was Christer’s name for her. It took him 30 years to not doing that. In the end I got the raw plates with the boat.

I could not be happier!

Instead of carving the letters into mahogny I’ve decided to glue laser-cut letters which I’ve ordered in Barcelona, during a short trip. They are cut from balsa plywood. I like the technical font (I chose it after all) and the way they are modern (typography) but traditional (wood, mahogny).

First step was to shape the boards. Again, I’ve chosen not to shape them in traditional, ornamental way but to keep them simple.

Then came the hard part - how to space letters… It took me almost 3 minutes to decide…

IMG_3697.JPG

After dry fitting the fun began.

The plates were covered with 3 layers of West System epoxy, wet-on-wet. On the last layer I’ve glued the letters which also got 3 layers of penetrating epoxy.

After curing and washing in water with soap (amine blush) I could start varnishing the whole thing. That prove to be a nightmare - due to extruding letters it was prone to have spills of varnish which then never cured properly, forcing me to scrap bubbles and spills and restart again.

In the end thou the result is pleasing, I think.

IMG_3743.JPG

I’ve attached the plates with 2 brass screws, with walnut washers as a distance from the hull - to prevent any dirt or water gathering behind.

View fullsize IMG_3932.JPG
View fullsize IMG_3934.JPG
View fullsize IMG_3935.JPG
March 22, 2018 /Lukasz Kumanowski
Comment
IMG_3944.JPG

Portlight frames

March 18, 2018 by Lukasz Kumanowski

I’m not a big fan of shiny metals, especially on boats. And if they shine - they must be perfect. Like on Harley Davidson.

Portlight frames on Meritaten were originally chromed. That was 60 years ago. Time is ruthless, the chrome developed dents and cracks which turned black. Since the previous owner(s) did not remove them before varnishing the cabin they were covered with old, peeling varnish. I felt it’s high time to put it into proper shape. After all, Meritaten is turning round 60 this year.

After removing the frames - with much effort, as they were glued with Sikaflex (what an idea, really - no wonder no one was then attempting to remove them for varnishing!) I could take them to my small workshop for cleaning and polishing.

IMG_3120.JPG


At first I was trying to polish down the black marks and bring back the glamorous chrome. That proved to be fruitless - the cracks were all the way through chrome up to the brass foundation.

IMG_3118.JPG

Well, that’s even better. I tend to like more the look of patina which copper and its alloys develop after a short time exposing to wind and water. In my eyes it’s classy. It is also well protecting the metal underneath as the oxide barrier is inert and does not extend any deeper.

Off it went then - with much effort (and noise) I’ve gradually ground down thin layer of hard chrome, up to the bare brass.

View fullsize IMG_3706.JPG
View fullsize IMG_3708.JPG

After that I polished them with brass polishing paste and high-speed soft pad.

I have no illusions that this mirror surface will last without constant polishing or waxing. That’s not my purpose. Having the parts polished should enable more or less uniform oxide build up, so that before they reach brown-green colour they will not look like someone vomited on them.

We’ll see how it will develop.

IMG_3707.JPG
March 18, 2018 /Lukasz Kumanowski
Comment
  • Newer
  • Older

Powered by Squarespace