Boatworks

  • Main
  • Louve
  • Typewriters
  • Workshop
  • Meritaten
  • Glypto
  • Motoko
  • Inspirations
  • About

Primus 391 - alcohol burning lantern

January 05, 2021 by Lukasz Kumanowski

It was high time to fix this lamp.
It's my first alcohol-burning lantern to fettle with - Primus 391. Photo above shows her in finished condition.

The lanterns is from 1945 if I decode the stamp properly: AJ8

Of course it was not always like that - this morning she looked little more miserable.

As the lamp came without jet I've decided to refurbish her back to original configuration - for burning alcohol.

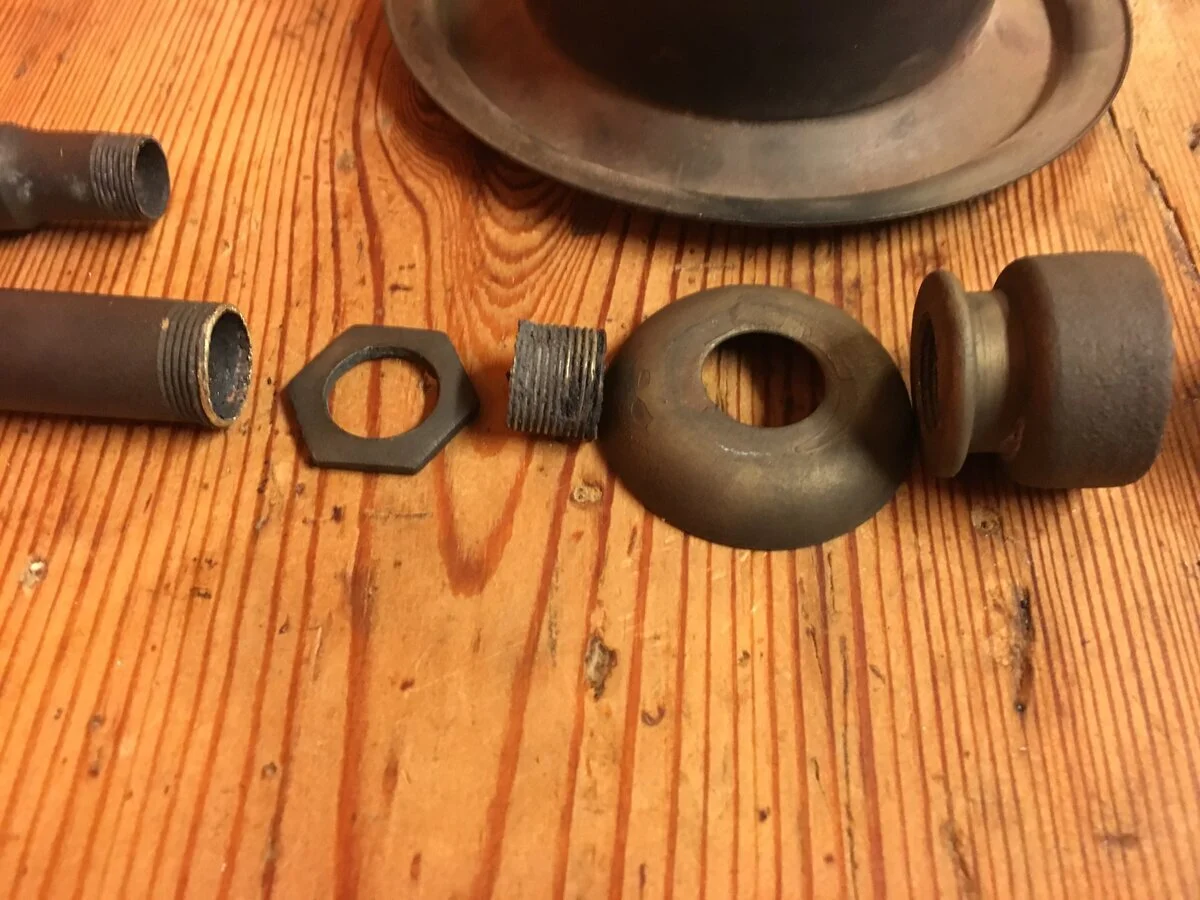
Air-tube end (the one which hides in the collar) was partially crushed, probably to restrict air flow in alcohol config. I've repaired the tube and planned to turn brass component, similar to what Morgan is showing here: 1952 - Primus no 1321 för sprit (alcohol)

However - as a quick fix, before I'm back in my factory's shop - I took old nut of proper size and shaped it by hand into matching form.

View fullsize 391_3.JPG
View fullsize 391_4.JPG
View fullsize 391_5.JPG

I had no idea how small the opening should be so I took this guess. Turned out to be perfect.
Thanks to Nils I know now that the opening should be of 3,5mm diameter.

Second missing part was small mesh disc which Nils mentions in this thread: 1952 - Primus no 1321 för sprit (alcohol)
I've punched it from one of these ugly, plastic funnels we get with our lamps.

Mounted on pricker rod.

Last missing part (I hope) was box nut which seals the whole assembly.
I don't have any Primus donors laying around so I took it from Optimus spare parts. It almost fits, I needed to cut graphite sealer a bit and tape threads with Teflon tape - Optimus thread is not the same as used on this Primus. With this primitive but invisible fix I managed to seal the assembly.

To save Primus original globe I run test with expendable Petromax glass. Forming new 200 CP mantle shown below.

After the new mantle was pre-burned I re-assembled the lantern with original globe.

The light output from this tiny lantern is exceeding all my expectations!

My so-far best small lantern, Optimus 930, is falling on Place 2 now.
Especially that it's rated on 300 CP.

This tiny Primus 391 is brighter than Optimus 200/1200 in my collection!

No renovation is complete without field tests. After all - these are tools, not just art pieces.

Obligatory walk through the woods, to check post. Moderate wind and no rain - perfect for lantern test.

Light output is outstanding!
Heat production also.

After tests I can say that Primus 391 feels best indoors or in shielded areas. At least my lamp.
With night breeze the lantern flickered and I needed to adjust its position towards the wind, to keep the light.

It is a perfect tent or boat lantern - especially due to lack of kerosene fumes on start/finish. Especially on boats, where many use alcohol stoves, this lamp would make sense. Noise level is moderate, not as noisy as Optimus 1551 but still far from Primus 981.

Below is a "family shot" showing different Primus lamps side by side.
I post it because I lacked such comparison when I was looking for field lanterns some time ago.

Standing on the bench, from the left, are 2x Optimus 930, lighted lamp is Primus 391. To the right of it is Primus 981 and Primus 1020.
Hanging behind is the mother of them all: Primus 1001.
Monstrosity on far left is Optimus 1550.

January 05, 2021 /Lukasz Kumanowski
Comment

Primus 1001 V14, "blue hat"

January 05, 2021 by Lukasz Kumanowski

I’ve finished renovation of Primus 1001 with blue vent. This lantern is from 1931.
More details here.

January 05, 2021 /Lukasz Kumanowski
Comment

Primus 1001 V14

January 05, 2021 by Lukasz Kumanowski

I'm done fettling Primus 1001 V14 with blue hat. This lantern was built in 1931.
This is the lamp I mentioned here, which I considered a candidate for nickel de-plating procedure.
Luckily I've slept over this decision and decided to give her little more elbow grease and polish these remains of nickel she bears.
On photo above there is she, after I finished fettling, with her older sister hanging above.

As always - pressure tests before final assembly. This lantern has a different style of burner than my oldest 1001. Not only the dome is different but also the flame spreader has brass grill instead of just openings.

Looks quite OK but I will probably try another jet, once it arrives from Fogas.

View fullsize 1001blue_4.JPG
View fullsize 1001blue_5.JPG
View fullsize 1001blue_6.jpg

This fount has no "Patent number ... " engraved, unlike my older 1001.

You can see that it had a harsh life. All steel parts were heavily corroded. I didn't make any "before" pictures because I don't want to remember that view.
You can also see how much brass is shining through thin and worn nickel plating. That was a reason I thought about removing the whole plating.

Original glass is broken. I consider gluing it with high-temperature epoxy or making mica globe instead. The good thing of this situation is that I don't need to worry about breaking this globe. It's done already!

View fullsize 1001blue_9.JPG
View fullsize 1001blue_10.jpg

This lantern came to me with a kind of wick in alcohol cup. Other 1001 which I repaired had rests of this material which I considered just dirt but this one below is clearly something put there on purpose.

We suspect it is asbestos.

I'll keep it as an original part of this lamp. Just need to treat it with respect if this is indeed asbestos.

January 05, 2021 /Lukasz Kumanowski
Comment

Pimping Optimus 300

January 05, 2021 by Lukasz Kumanowski

I’ve recently finished rebuilding old Optimus 300 from 1931.

Below are some photos of finished lantern. How I got there is described here.

View fullsize 300 cleaned out 5.JPG
View fullsize 300 cleaned out 7.JPG
View fullsize 300 cleaned out 1.JPG
View fullsize 300 cleaned out 2.JPG
View fullsize 300 cleaned out 3.JPG
View fullsize 300 cleaned out 4.JPG
View fullsize 300 cleaned out 8.JPG
January 05, 2021 /Lukasz Kumanowski
Comment

Rebuilding Optimus 300 from 30's

January 05, 2021 by Lukasz Kumanowski

I've just got (for free almost) Optimus 300 lamp, simillar to the one Nils has here: 1931 Optimus 300

I tried disassembling it before lightning. Unfortunately J-tube broke while trying to unscrew holding nut and mantle holder.
I've managed to free these parts (holder and nut) from tube rests but now the tube is shorter by a good 12mm.

I'm considering turning a brass extension/adapter to fill this miss but I'd rather replace the J-tube instead.
Tried finding replacement in Fogas but they don't seem to have it.

In the worst case the lamp will serve as a donor for the other 300 but it would feel good to resurect her.

View fullsize IMG_1291.JPG
View fullsize IMG_1292.JPG
View fullsize IMG_1288.JPG
View fullsize IMG_1289.JPG
View fullsize IMG_1290.JPG

It turned out to be quite an easy fix.
I considered 2 options: brazing copper/brass extension pipe or making screwed-in adapter.
I went for the adapter since the original J-tube is thin walled and quite weak. I was afraid that brazing could puncture it. Besides - adapter gave me an option to fine-tune the air gap since my Optimus 300 does not have any options to regulate that.

I found copper pipe of adequate internal diameter. It turns out to be a standard dimension used in Sweden for most water/gas installations. I found mine in a pile of junk in my factory.

Threading on the original J-tube was a bit of a mystery. Closest threads matching are M15x1 and UNF 5/8"

Since the lamp was made in Sweden long time ago they definitely used imperial threads so I went for UNF 5/8".

The original thread is so thin - and J-tube so thin-walled - that it was collapsing while I attempted re-threading it.

After straightening the J-tube back to circular shape I've turned temporary reinforcement to add stiffness to the pipe.

Threading went well then.

The adapter is made from brass, it's simply an oversized nut.

After trimming length of both new components I could assemble the lantern.

The adapter is hidden inside the hood, not visible if you don't disassemble the lamp.

Internal diameters matching nicely.

Tried first time without the globe nor mantle - looked good enough for me to try with the mantle.

And so she woke up!

Compared to my other Optimus lamps this one is very silent - and probably the oldest of them all.
After 1h of operation still all was good so now it's time to clean her and give her "living-room look"

Post scriptum to this part of the adventure:
I've recently bought another, slightly younger, Optimus 300 in really bad shape (bought it only to get a globe).

Out of curiosity I disassembled the vent to see if I can extract J-tube, as a replacement to my adapter solution.
To my surprise the setup is almost identical to what I have "invented".

I had to tear apart the vent as someone used steel screws which galvanically corroded and welded all parts together.
Exploded (literally) view below:

After some cleaning the J-tube assembly back in one piece:

As a side note - this "heavily fettled" Optimus 300 is now one of my favourite workshop lamps. Probably due to all work which went into fixing the lamp (there were all kinds of problems, including punctured tank close to pick-up valve) I like it very much and it will stay in my collection. It acquired character, I guess.
Too bad these lamps are so susceptible to wind blows. Not really storm lanterns - for heavy weather I take Radius 119 or Primus 981. Optimus 300 is an indoors beast.

As an indoor lantern now I’ve decided to pimp her up properly.

I gave it some time, running the lantern every evening. Things were not perfect, still.

This lantern gave me so much headache that it became masochistic fun to fix her. Every now and then it didn’t want to start, flaming and darkening the mantle.
J-tube replacement was only partial success - running lamp was smelling kerosene, even though it was bright. It had also troubles starting. I was on a verge of dumping it - I mean selling.

However - I developed a feeling to this old bugger so it became an object of few experiments.
Below is the effect - "money shot" of fixed lantern in polished brass.

I used her to test MetalX B-929 nickel stripper from Caswell Europe.
Contrary to traditional methods this is advertised as safe way for home-tinkerers to use. No toxic fumes, no electricity. As long as waste is disposed properly it should not be dangerous.

Below shot shows the fount before the bath. You can see that nickel plating is worn in many places so I felt no regret.

Other parts in moderate condition, just cleaned properly to avoid contamination.

Process temperature is 50-65 degrees Celsius, I used hot water bath to keep it in that range.
Fresh solution has lots of sulphur which acts as a catalyst (I think)

Below is the soup after 20 minutes. Sulphur is gone and I don't have any loose to add to the bath but the process goes further anyway, just slower.

After the bath nickelled parts are covered with grey slurry. There are few ways described in manual how to get rid of that. One can apply current in fresh bath or use some other (toxic) chemistry to remove slur but I found that hand rubbing (in proper vinyl gloves) takes care of that.
Emerging parts are free from nickel, exposed brass is dull but clean.

What is left is rinsing with clean water and proper wash. I use Cif, works wonders. Then some standard elbow-grease with polishing paste. I use Petromax paste.

Polished fount as opposed to bare brass cage.

Now there comes another hack: I had a small leak at vaporiser base, in the fount. It is a tiny puncture on the fount, very close to the solder line. It was repaired by someone before with silver solder but it got loose with time.
At first I thought about repairing it properly and re-soldering but given the proximity of all vaporiser base and other openings I was afraid that heat will loosen everything around.
Another option was epoxy - I work with several types of these and use one which can move up to 50% after curing up to 200 degrees C.
But - being a lazy person I decided to turn a small brass ring and seal the whole area with temperature-resistant silicone washer.

Recess in the brass ring accommodates another washer which seals the pick-up tube, instead of traditional lead. I use thick Teflon washer here.

Assembled components.
I have a soft spot for pressure gauges so I equipped the lantern with after-market one from hytta.de

The lantern is now equipped with another vent which I stole from my other Optimus 300. This looks to be a mix of last Optimus 1550 J-tube assembly with Optimus 300 vent.
J-tube size is much different from original I had so I was a bit sceptical if it will work with the same jet as before. Turned out it works fantastic!

With this modification I can fine-tune the amount of mixture - full throttle seems to work best. The lantern is very bright now and there is absolutely no smell of kerosene!

Vent parts went on separate, smaller bath. I use my darkroom sink to keep the chemistry out of the kitchen. Optimus 5 is doing its job.
I use water-bath again - this time water is between walls of this old Italian pot.

Here is the shot of vent parts after the bath. Apparently I screwed-up my chemistry by putting vent's top there. I recall now that the very top is chromed rather than nickel-plated so the bath did not remove it. Instruction is very clear that NO CHROME should be put into the soup. I guess my bath is now spoiled.

Plating on vent top had to be removed mechanically. I could have ordered brass replacement from Fogas but... it took only 15 minutes, including buffing afterwards.

Here are Optimus 300 brothers. The right one, plated, is yet to be pimped.

The last thing to do was to fabricate J-tube holding fixture. My Frankie-vent lacked it but there were openings for it ready.
I took a piece of brass and formed the fixture with hand files.
Bronze M6 screw will hold the J-tube. I chose big screw, as opposite to small plungers we have in other Optimuses, because I saw that these thin, sharp-pointed screws can sometimes cause punctures in J-tubes if someone is too enthusiastic with tightening them.
Surface area on M6 screw should provide enough friction to hold all in place.

Mounted inside the vent.

The lamp is now working for at least 50 hours. No smells, easy ignition, no leaks. Life is good.

As a summary - B-929 nickel stripper is a bit costly but seems safe for amateurs like me. It's a messy job but effects are good.
In most cases I try to save original plating but for hopeless specimens - and just for fun - it's worth trying.

However: it’s tempting to use this soup on any lantern which has less-than-perfect nickel coating.
I have to sleep over such decissions, after all this will change the original look of the lamp. Some of us value the original thing, even if it’s worn or abused.
So don’t rush with this decission!

I’m currently fettling Primus 1001 with blue vent. Its fount has nickel in very bad condition. It would be easy just to strip it down to brass and polish to mirror finish but how would that look together with rust-etched globe cage etc?

January 05, 2021 /Lukasz Kumanowski
Comment
  • Newer
  • Older

Powered by Squarespace