Boatworks

  • Main
  • Louve
  • Typewriters
  • Workshop
  • Meritaten
  • Glypto
  • Motoko
  • Inspirations
  • About

Deck

June 11, 2023 by Lukasz Kumanowski

The weather was so nice that I changed my plans: instead of crawling in the bilge and making fillets I focused on finishing decking.

A bit of a jigsaw puzzle - to optimally use wood, avoid ugly knots (some of them are nice thou) and make it look harmonic.

I started with the main deck, as the easiest to fit. The plank closest to the centerboard case needs to be wide and rest on battens on the case. I don’t have wide enough wood to carve it from one piece so instead I ripped and cut battens to be glued and screwed on the edge.

Dry-fitting before gluing. I made the battens a bit wider than needed - after the glue sets I will trim them to size.

The opening opposite to centerboard case doubler is there for rubber line which will hold centerboard in position while sailing.

While these planks are being glued I switch to the aft deck.
The hatch there will be as wide as possible, so that I can keep full-size charts under rubber bands and do my navigation on such “table” and still be able to open it.

Soft batten to find a sweet curve for final shape.

Central section is wide and almost flat. Sheet clit will be there so I don’t want any excessive overhang which will grab the rope.

When deciding on spaces between planks I diverted from specified 5mm gap and made 3mm instead. It still will allow wood to move/expand and for bilge to ventilate but it will be less likely to grab any rope. Roger Barns had a capsize once, due to the sheet rope caught between planks.

All my wood is plain-sawn hence it will cup. I aligned planks so that middle of the plank will rise while edges will go down. So called “smiley” when you look onto grow-rings.

It turned out very well.

I marked each plank on the underside so that I will not have to solve this puzzle again when I remove them for maintenance (oiling).

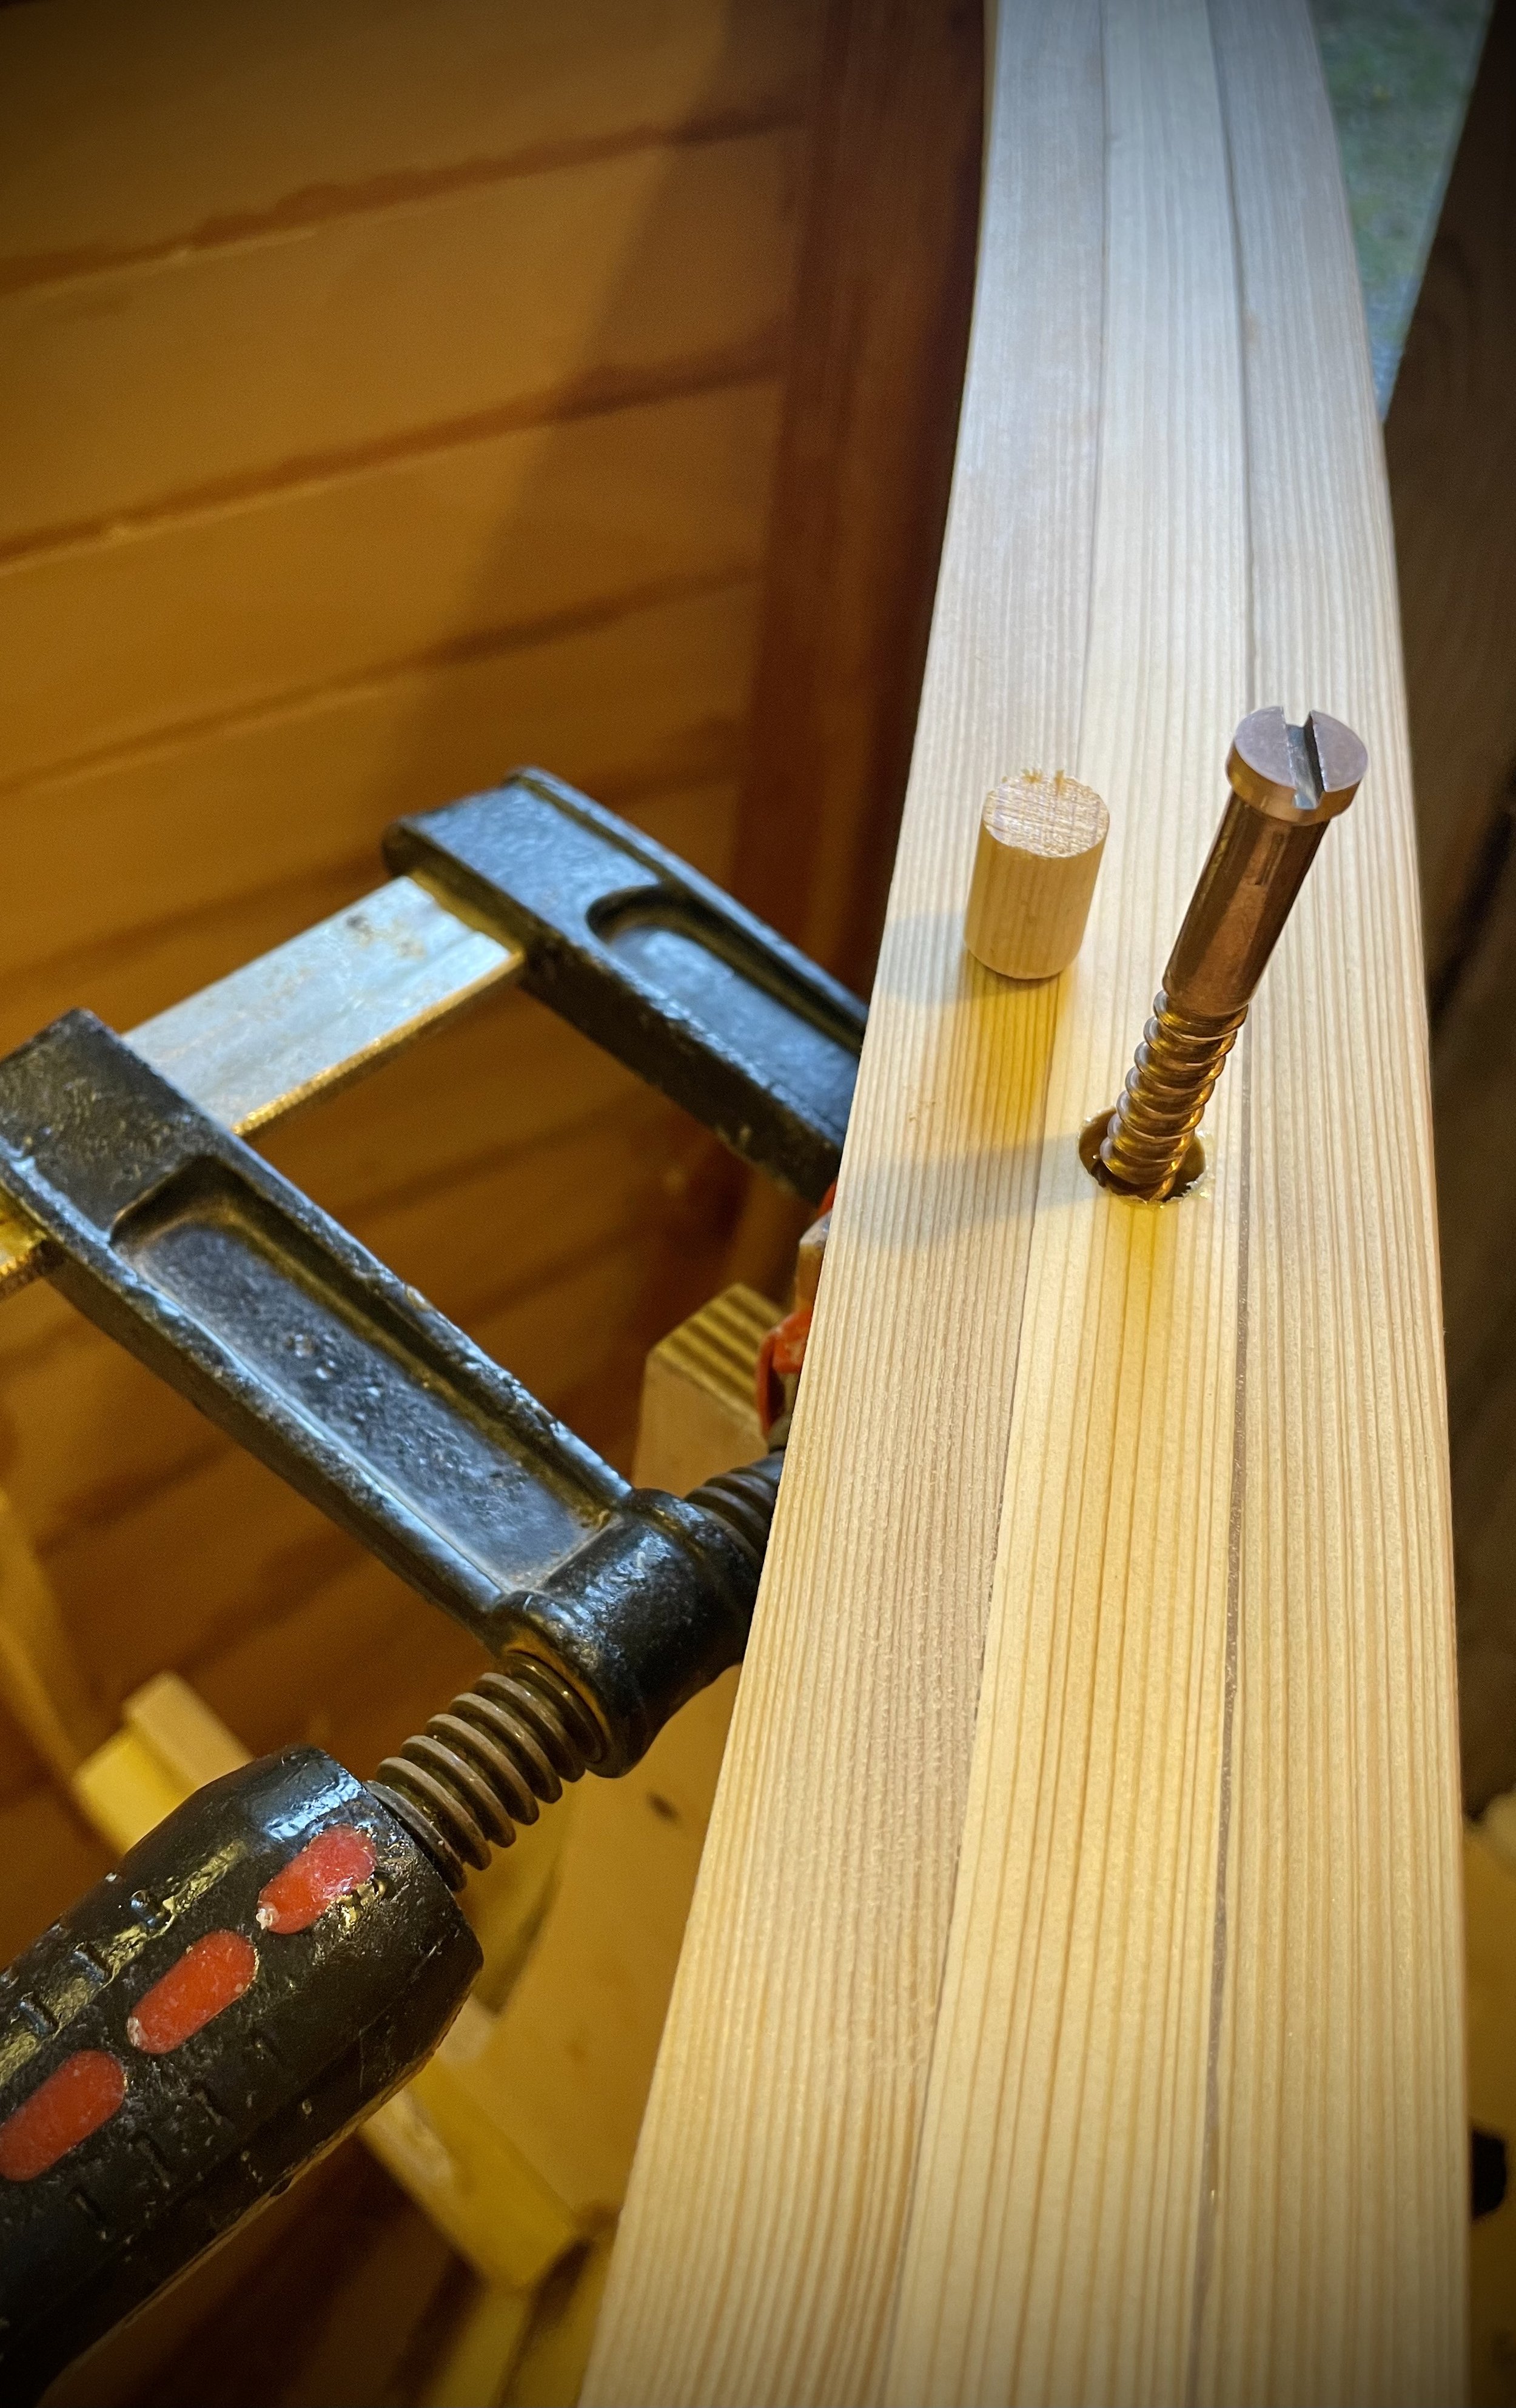
Next step will be to drill holes for screws and then I will remove the deck for oiling.

June 11, 2023 /Lukasz Kumanowski
Comment

Additional rubrail

June 10, 2023 by Lukasz Kumanowski

With day-job taking most of my time during workdays I work on boatbuilding mostly at night. I aim to make a bit of progress every day.

It is still cold at nights - temperature dropping to five degrees Celcius - so I need to crank up kerosene stove so that glue job has a chance to cure overnight.

Last few evenings I was shaping and installing additional rubrails.
Now: these are not in plans and Ilur is complete without them. However - I like this beefy, cocky look of boats with double rubrails. They remind me traditional Polish fishing boats. And Ilur is based on fishing boat, ain’t it?

Anyway - apart from the look there are advantages to have these second rubrails on plywood boat: they protect bottom edge of the sheer strake, they further stiffen the hull and provide timber surface to mount boom-tent hooks or other auxiliary fittings. Weight penalty is very low.

As I was gluing bungs which close screw holes on rubrails I also installed bronze screws which further reinforce quarter knees at the transom. It ain’t go nowhere now!

June 10, 2023 /Lukasz Kumanowski
Comment

Quarter knees, more battens

June 06, 2023 by Lukasz Kumanowski

I ripped additional rub-rails on my highly professional setup. Works well if the weather is fine.

Quarter knees could finally be installed.

Glued and screwed to the transom. After epoxy cures I will also bolt them to gun-rails. They will double as mooring posts so they need to hold well and I don’t trust glue enough to not support the joint with some silicone bronze bolts.
Nothing too strong ever broke.

As a last job at transom I glued additional batten, cut at 27 degrees. It will support half-deck where the hatch will be mounted.

I could instead just mount a plank parallel to the transom, like some builders do, but I find it more pleasing with all deck planks going in the same direction.
Without this batten they will be held only at one end, risking damage if I jump on the deck just there.

All these glue-jobs always leave a lot of squeeze-out epoxy. I use it, after thickening, to make fillets in the bilge and flotation tanks. Up to now I filleted most tanks. Coming evenings I will focus on finishing fillets in the bilge so that I can paint it and lay deck.
Additional rub-rail will come in parallel.

June 06, 2023 /Lukasz Kumanowski
Comment

Epoxy-coating

June 05, 2023 by Lukasz Kumanowski

Good few hours job in awkward positions, divided into several evenings: epoxy coating of the interior.

Contrary to Caledonia Yawl - Ilur comes out of molds with almost complete internal structure. This saves time and is ingenious but it makes painting a bit more difficult.

I was eagerly waiting for this moment: all glue lines and stains disappeared under even, honey-like surface.
My boat starts to look serviceable!

June 05, 2023 /Lukasz Kumanowski
2 Comments

Centerboard case finished. Bolting frames. Sanding

May 31, 2023 by Lukasz Kumanowski

Last steps before epoxy encapsulation.

I turned massive bolt heads into smaller diameter, to fit bungs for gunwale. There will be hardly any pull here, only sheer forces should I collide with anything hard. Smaller diameter heads will not compromise these joints and will be aesthetically more pleasing.

View fullsize IMG_7888.jpg
View fullsize IMG_7887.jpg

I drilled broadly to avoid splitting the plywood. Just in case each frame/bulkhead is clamped strongly so that the screw thread can carve the wood without risk of splitting it. Holes are first filled with unthickened epoxy and screws are degreased in acetone. I aim to make it a strong joint.

View fullsize IMG_7889.jpg
View fullsize IMG_7890.jpg

Bangs glued in and trimmed flush.

I trimmed centerboard case and sanded for epoxy coating. All sharp edges softened to small radius - will hold finish better and spare my legs when I unavoidably collide with them.

I felt frivolous so front and back edge of the case is trimmed with American walnut. The rest is mahogany.

I sanded all the interior, knocking down sharp radius on all parts. Vacuumed the boat so I can start with epoxy coating.

Next steps, after I coat the interior, will be filleting and painting the bilge and tanks. The rest will be kept bright. Fillets in the bilge are mostly for easier maintenance - preventing dirt and water from staying in tight spaces.

After the epoxy cures I will install quarter knees and fill tanks with foam. Deck and benches will come next - for them I plan to use Owatrol oil, for easier maintenance and satin feel. Same for thwarts which I will probably glue from Siberian larch or northern pine.

Lastly I will make mast partners - that will be oak. With that in place I can lift the boat onto trailer and start disassembling the shed - to make place for building the mast.

May 31, 2023 /Lukasz Kumanowski
1 Comment

CB-case trim. Main sheet cross member. Bits & pieces

May 28, 2023 by Lukasz Kumanowski

Centerboard case should have been finished before mounting into building frame. I left the final trim to be done when the hull is finished.

Side reinforcements and cup are made in mahogany.

Dry-fitting. As this is a rather crucial alignment I use three guiding screws so that the whole cup does not move during gluing.

Masking tape - to avoid epoxy spills inside the centerboard.

Glue spreaded, bangs hiding screw heads already in place.

While this was curing I milled another piece of mahogany - for main sheet cross member. The kit comes with a nice, ornamental pattern for this piece but I chose to make it in simple shape, just with rounded edges.

While at it - I decided to cover the plywood edge with a thin mahogany veneer, to blend with the main sheet cross member. This edge will be visible every time I open the hatch so it was worth an effort to make it look good. I planed down plywood edge by a millimeter and milled a matching veneer.

Plywood edges on bench-bulkhead connection need to be somehow protected and hidden.

Since I plan to keep the interior bright I milled trimming piece in larch. Glued in place, will be trimmed after epoxy cures.

I finished shaping and dry-fitted oak quarter knees. They will be glued after epoxy coating of the interior.

Last thing for this weekend was drilling holes for gunrail-frames bolts.

I will use massive bronze screws (diameter 8mm) which are leftovers after my work on Meritaten’s frames and floor timbers. They have a bit too wide heads for bangs which I have so I will have to mill them down a bit.

Next weekend I want to epoxy-coat the interior so during the week I need to:

  • finish CB case trim

  • sand the interior

May 28, 2023 /Lukasz Kumanowski
Comment

Gunrails - finishing touch

May 24, 2023 by Lukasz Kumanowski

I glued the remaining starboard gunrail during the week so today I planed them down to smooth, uniform surface.

Next steps:

  • bolting gun-rails to frames

  • centerboard case trim

  • fillets in the bilge and flotation tanks

  • sanding of the whole interior 

  • epoxy encapsulation

  • painting

  • sole boards - gluing, bolting

  • quarter knees at the transom

  • mast foot and partners

  • … and other remaining bits & pieces

It feels good to be able to see her sheer line with rails installed. Not as pronounced as on American boats but rather modest and balanced. French style.

May 24, 2023 /Lukasz Kumanowski
Comment

Wrestling with gunrails

May 21, 2023 by Lukasz Kumanowski

This is a job for two persons, really. Long and semi-elastic wood pieces which need to be bent and squeezed into the hull, wanting to jump out of the place destroying sharp and fragile edges and shaped ends.

But I work alone so some sort of systematic approach was needed.

I started with measuring the length along sheer plank. I use paper masking tape - it is almost non-elastic and sticky. Even if it stretches a bit - that’s not a bad thing: the piece will be a bit too long which is always a good margin.

Transferred to the piece.

I take stem and transom profile using a small wood block and transfer them onto gunrail.

Cutting with handsaw and trying on the boat. Stem looking good, transom-end is a bit too long, as expected (or hoped!).

I pair it with a thin saw until it can be pushed into position.

Before gluing I copy the piece onto the next gunrail plank which will be glued on the inside.

And so comes gluing. Stem profile fits nicely although I managed to damage rubrail edge when wrestling with the gunrail…

While this side cures I repeat the procedure for measuring and cutting rubrail for starboard side.

To fit it in place single-handed I first insert pointy edge into stem cavity and clamp the piece close to the stem. It will not fit all the way to the stem at this angle yet.

Next I slowly bend the gunrail while moving towards the transom, placing it on frame tops. Once close to transom I place a clamp as a frame which will hold the batten if it jumps out of position.

Now I can safely put transom end onto the transom. Ilur has this part angled so I use it as a convenient wedge, pressing down the batten alongside.

It moves all the way down while the stem end goes into its proper place. It goes even more smooth when the glue is spread, acting like a grease.

By the end of this weekend I managed to glue entire port gunrail and half of the starboard side. And I run out of clamps!

May 21, 2023 /Lukasz Kumanowski
Comment

Rubrails. Floor suports

May 19, 2023 by Lukasz Kumanowski

Fitting rubrails was a bigger job: I carved the stem to half-oval, tempered at the front. Now I needed to match a profile to fit this compound shape. Same at the aft where I already added some curvature.
Oh well, on my next boat I’ll keep all square and boring. For now I need to play with a bit more complicated fits.

One drawback of having the hull painted already is that some of this paint needs to go away for gluing. Preparing the stem for rubrail.

Anticipating that there will be a lot of squeeze-out epoxy I prepared my secondary job: additional floor supports. Some medium-difficult geometry conditions.

One trick for those who mess-up measurements by a millimeter: an old brass screw can make up for missed length. Epoxy is a wonderful stuff.

Port-side rubrail glued yesterday.

Floor supports used part of the squeeze-out, the rest was used for filleting in the bilge.

Temperature at night dropped to 3 degrees above freezing. Too low. Epoxy did not cure entirely overnight so I waited with clamps removal till late afternoon.

Today I fitted and glued starboard rubrail. Just in case I cranked the kerosene stove so I can continue work early morning tomorrow.

And yes - you cannot have too many clamps!

May 19, 2023 /Lukasz Kumanowski
Comment

Food for dreams

May 14, 2023 by Lukasz Kumanowski

While looking for typewriters on flea market I stumbled upon Nautical Almanac from 1953. It is, of course, outdated concerning celestial navigation tables but still useful for learning this skill. You can’t buy new ones anymore - they are only available in digital format.

The week after I found this treasure I got unexpected packet. It turned out to be from Leif! He made me a few surprises before with sending me magnificent nautical books. This time I got his sea charts and lots of tips for sailing destinations.

There you go!
After finishing work on my boat for today I sat down on the floor and started studying these charts. The old almanac by my side - I could pretend I’m in XX century, preparing the journey and planning equipment purchase needed. I like these old commercials and marine chandlers catalogs.

May 14, 2023 /Lukasz Kumanowski
Comment
  • Newer
  • Older

Powered by Squarespace