Boatworks

  • Main
  • Louve
  • Typewriters
  • Workshop
  • Meritaten
  • Glypto
  • Motoko
  • Inspirations
  • About
IMG_5402.jpg

Keel bolt #3 - Demolition man

January 01, 2019 by Lukasz Kumanowski

I’ve almost exhausted my scenarios for removing this stubborn bolt.

Hole saw did not work: after reaching certain depth it did not move any further. Vacuuming the dust and re-sharpening teeth had no effect. Null. Neda. Dead-end.

I switched to pneumatic sledge hammer in hope that constant vibrations will loose the bolt in the hole. 450mm long 18mm diameter drill was constantly banging this thing until smoke started to rise from the hole. Not a move. Neda.
After cooling down the equipment I’ve tried 4 more times - with no effect.

The only option now was to remove the floors to reach the remaining part of the bolt. Since this location will require rebuild of heavy frame anyway I was not hesitating to cut away the floors. Anyhow, I was curious to see the condition of oak which had rusted iron bolt - and is 60 years old.

Having now fresh oak from Poland gives me option to rebuild the floors so - here it started.

IMG_5394.JPG

First I’ve cut away the middle of the floor, along the channel for keel bolt. After reaching almost the bottom I turned to chiseling out the wood and splitting oak to pieces.


IMG_5396.JPG

Black, decomposed oak was all the way. No regrets. It gives me also the perspective how other floor timbers look like - they all need to be replaced.

But I focus first on this one.

IMG_5397.JPG

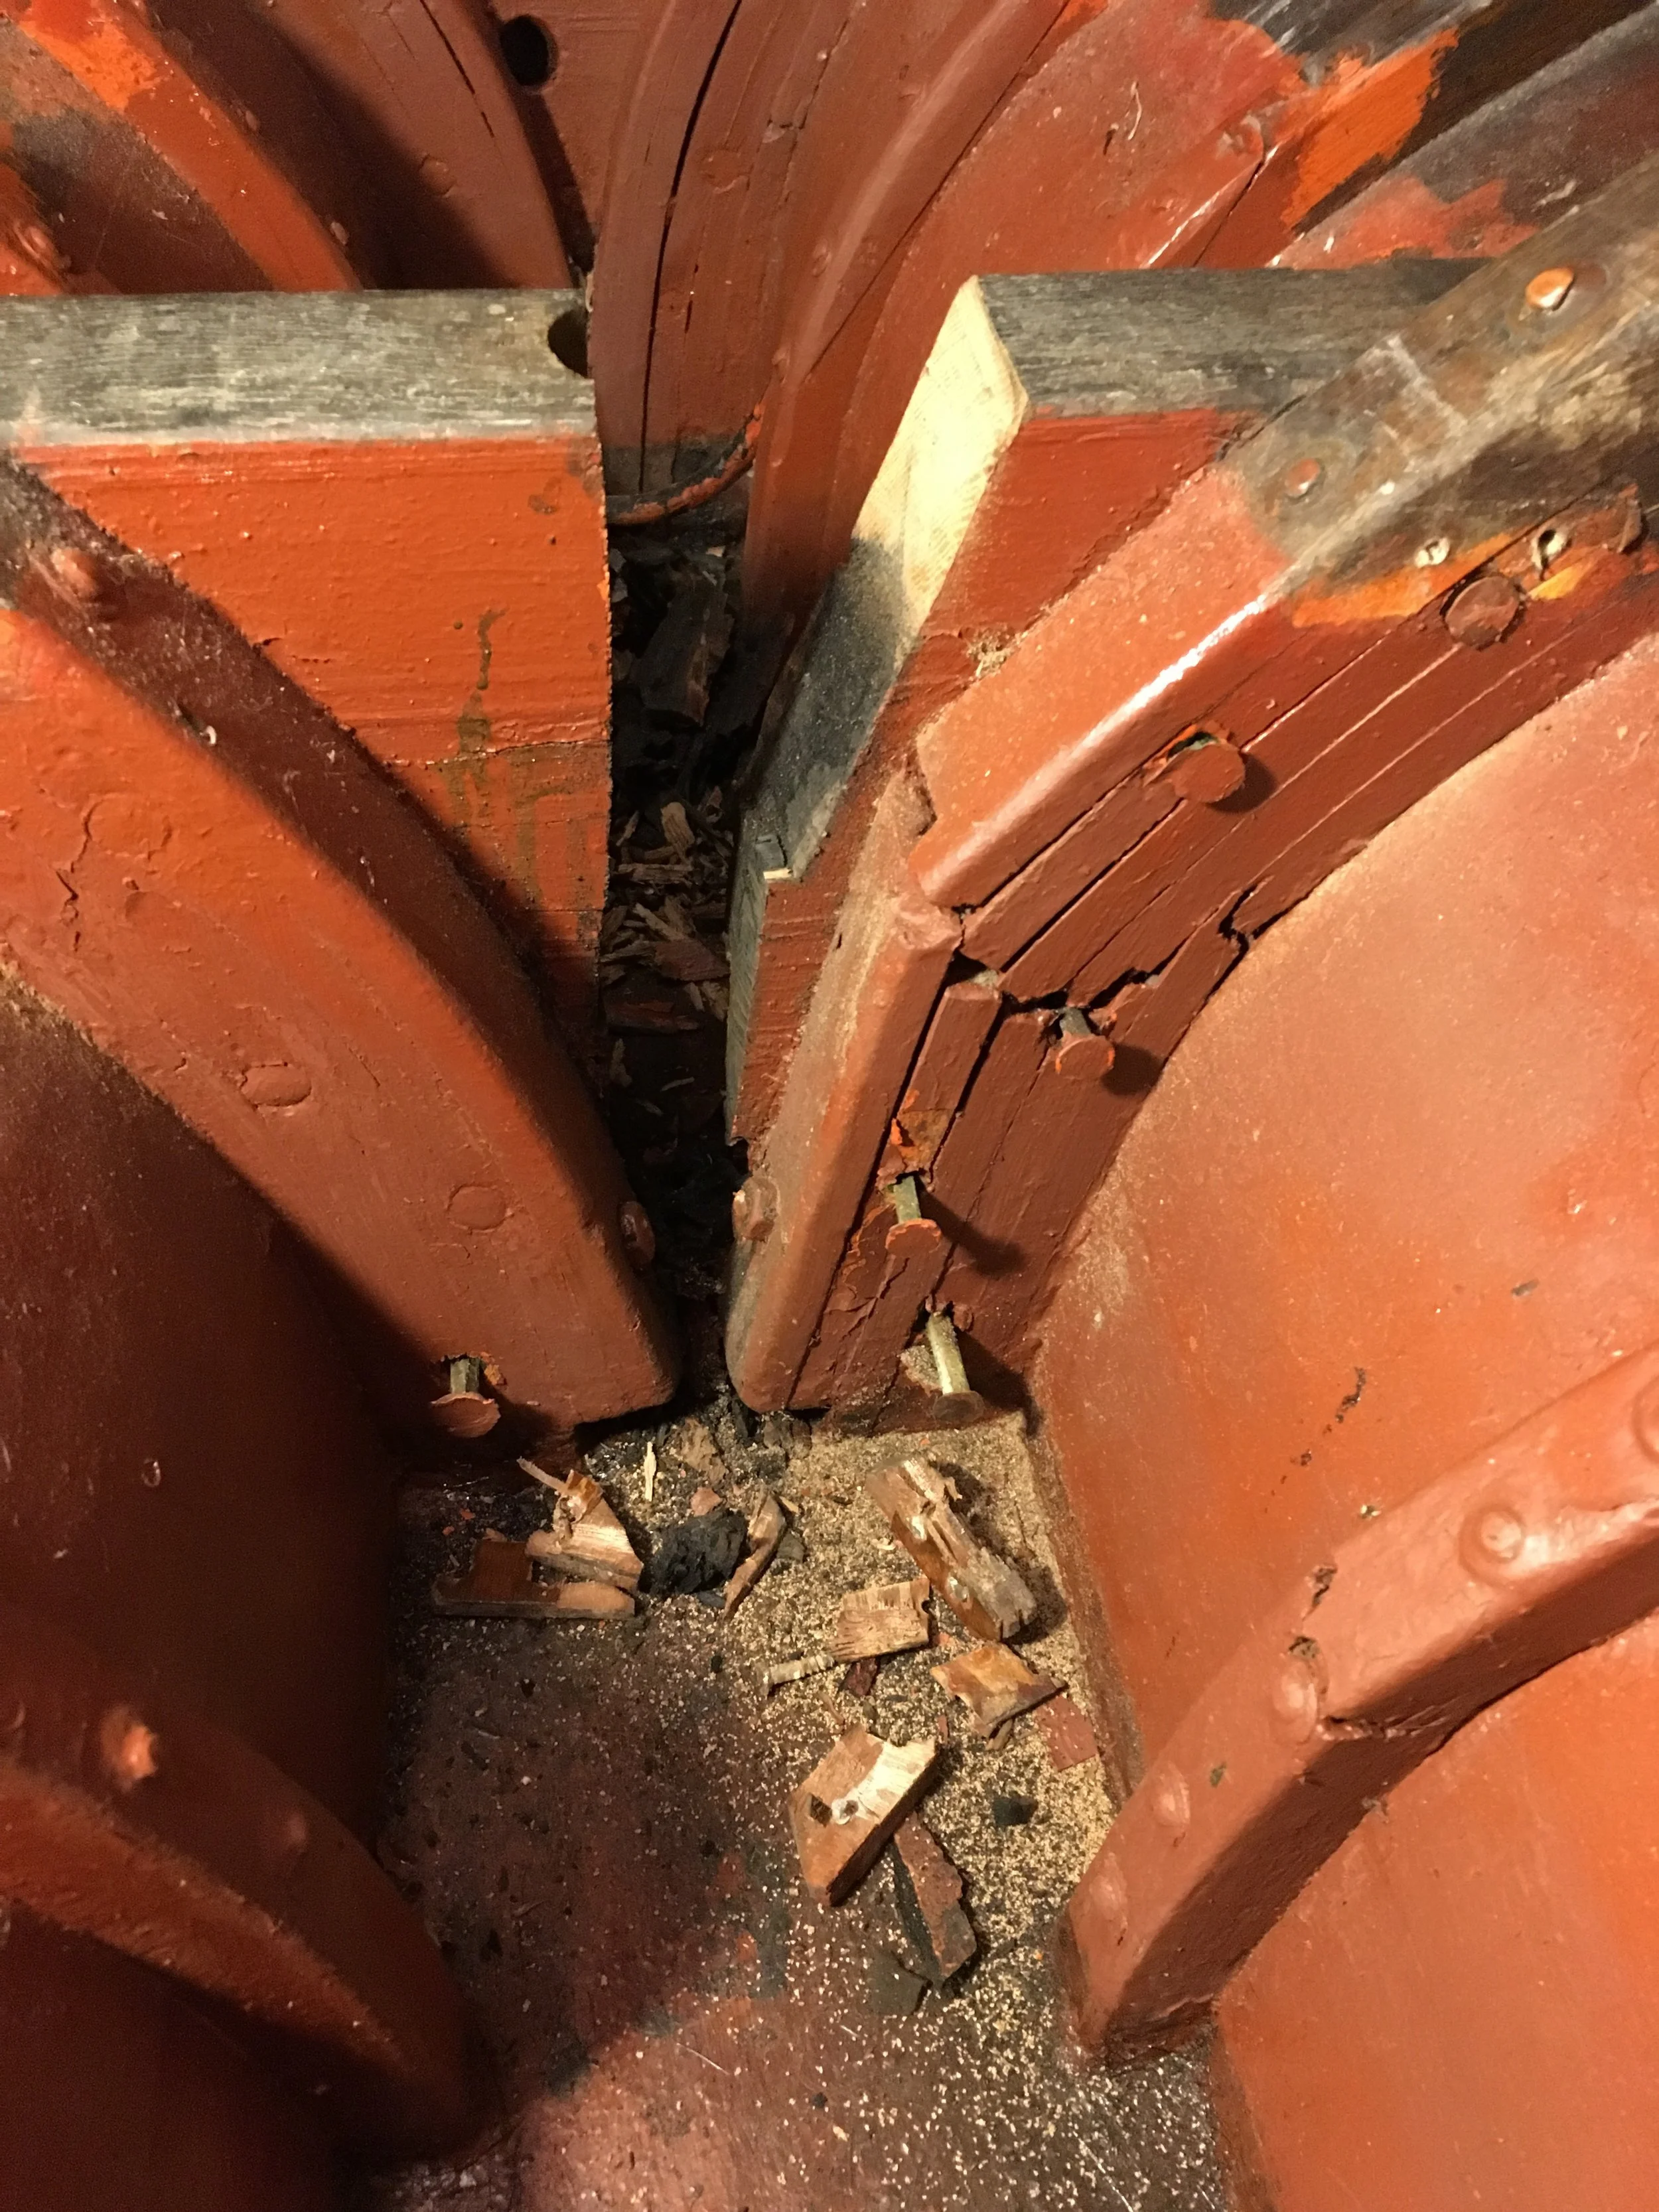
Due to close proximity of heavy frames I could not cut with saw all the way so splitting with chisels was the only option. Fasteners connecting floor to frame are copper rivets - rectangular and very thick. All of them in perfect condition after all these years. The only reason for oak deterioration is nail sickness, due to iron bolt passing through it.
I’ve chiseled oak from under the rivets to hammer them further - to expose them on the other side, easier for accessing with metal cutter blade.

IMG_5399.JPG

Demolition continued until the whole oak floor was removed. Unfortunately, Rosättra has used brass screws to connect floors to planking. They should have used bronze - brass screws became brittle (loss of zinc from brass) and impossible to drive out. After splitting all oak I could break the screws and - after careful removal of mahogany bungs on the outside - drive them out with a hammer. Easy but - it should have benn bronze, for Christ sake!

IMG_5400.JPG

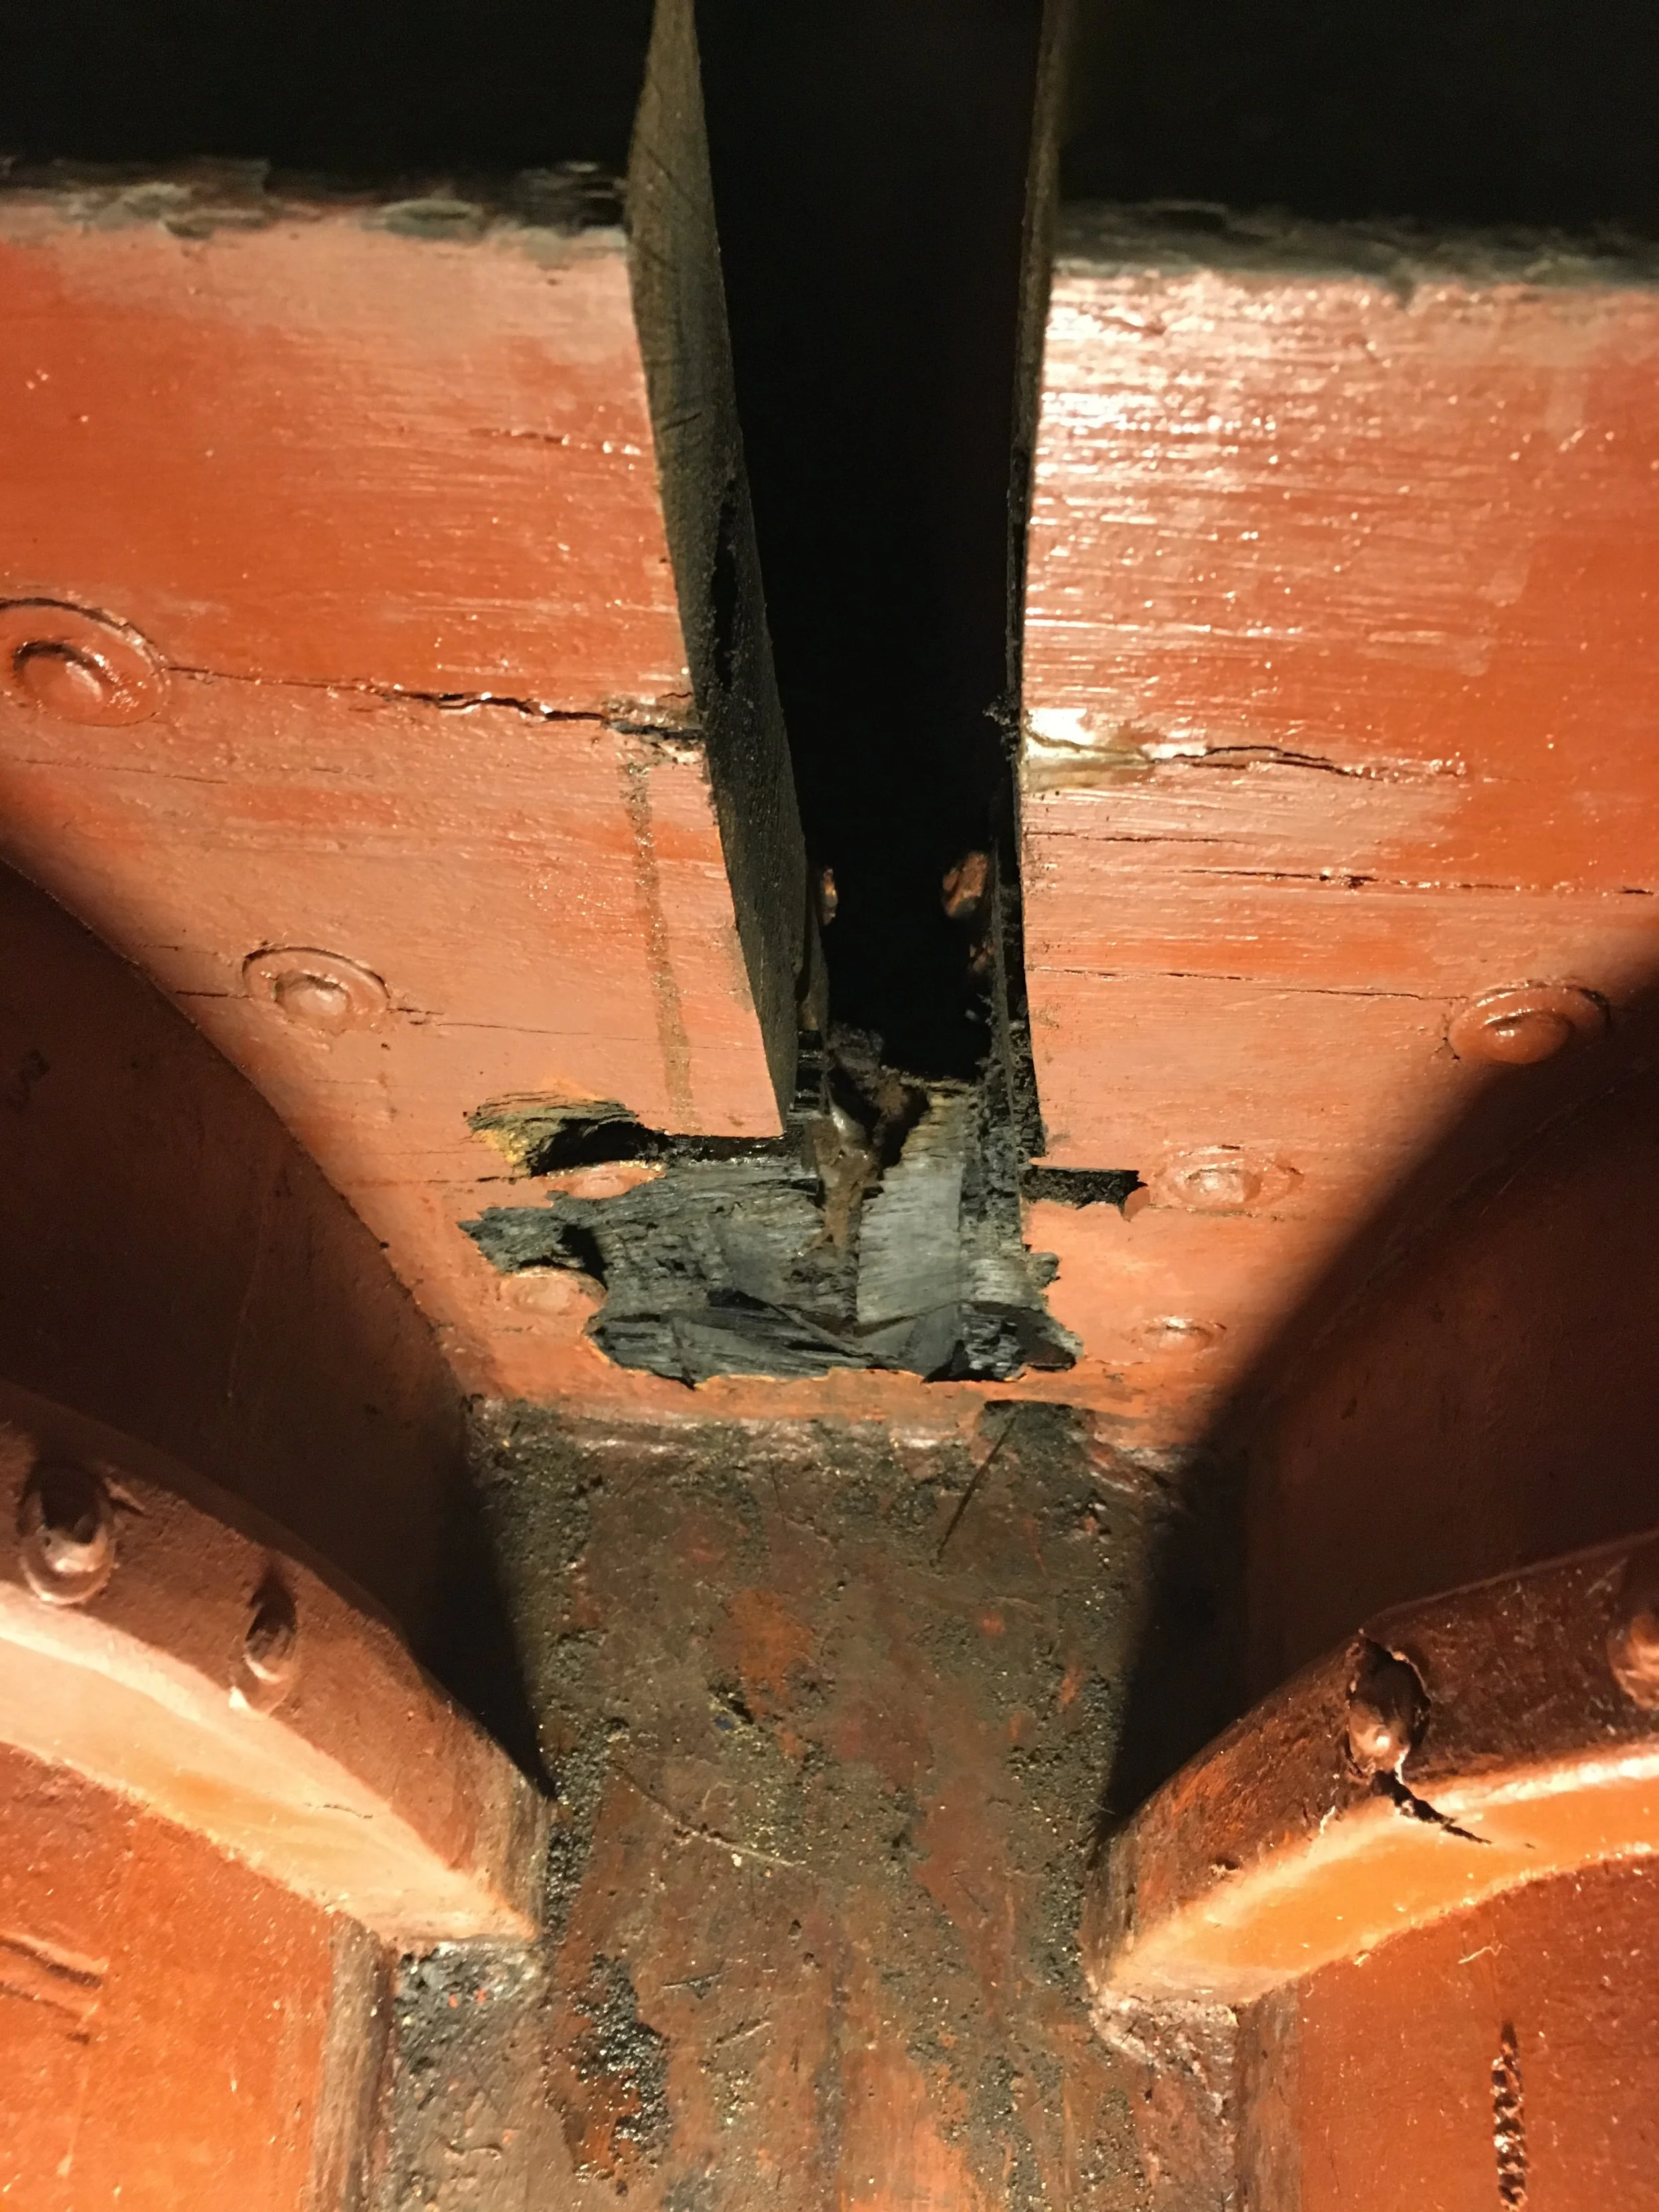
After cleaning the “operation theatre” the remaining part of the bolt is exposed. I’ve also partially removed the broken part of heavy frame in proximity.

What to do next?

I’ve figured that I still can wait with hammering the screw down and first try pulling it up (preferable method of removal) by finding a way to anchor chain in this short piece of the bolt.

I’ve drilled a hole via the bolt and inserted heavy-duty shackle.

IMG_5404.JPG

I’ve connected my jig to the shackle and tried pulling the bolt by slow pumping of both 10 ton lifts.

Then something broke. It was not the shackle. Not the chain. And no, it was not the sound of bolt moving up. The bolt opened itself and split, releasing the shackle from drilled hole.

Well, what next?

Drill another hole!

So I did - well, tried. The drill broke while drilling and stayed in the new hole. Shit!

What next? Hell, yet another hole!

So I did - this time successfully but I figured that I should use smaller shackle to leave as much metal in the bolt as possible. I’ve again connected my jig to the new shackle, tensioned it, went down to the ballast keel and blasted hell-fire onto the bolt until it turned glowing-red.

Then I returned to the cabin and tensioned the jig a little bit more. Nothing happened.
Down again and blasting again with flames until bolt turned red again.

Nothing happened.

It became very late - with snow blizzard already making havoc outside and shutting down electricity in the whole area - so I’ve left the bolt under tension and went home. Hopefully constant pulling tension will release some friction with time so when I’m back to my boat I can try again pumping the jig and remove the thing.

If that will not work then I have only one more option left: hammering down the bolt with heavy hammer. That should at least brake it loose from surrounding oak. It will also probably cause it to “mushroom” on top so either I cut away that or try pulling it out with yet another drilled hole and new shackle.

Or - I can leave it in place, cut flush with keel timber and drill on the side a new hole for new bolt - or a pair of bolts. I don’t like that but it is an option.

Anyway - at least now I’m certain that other floor timbers need to be replaced. That makes the backbone rebuild less distant in time - the boat needs it very soon!

IMG_5403.JPG
January 01, 2019 /Lukasz Kumanowski
Comment
IMG_5393.JPG

Keel bolt #3 - Struggle continues

December 30, 2018 by Lukasz Kumanowski

Came back from Poland after Xmas loaded with beautiful oak, 50mm thick!
It will be used for ribbs renovation and - if needed - for new floors, if my struggle with keel bolt #3 will force me to demolish floors through which it passes.

Anyway - this prima sort oak costed me a fraction of the price I would need to pay in Sweden - and I did not have to beg for it! Just went to local lumberyard and picked the one I wanted.
Big contrast to dealing with Pondus Snickeri in Stockholm where they struggle to keep their word in replying my request for lumber.
Well, another lesson for me: don’t buy things in Sweden where people are lazy and spoiled.
Go to Poland or Germany if you want to deal with reliable and trustworthy people.

After getting some advices from Marek and buying oil for drilling I was ready to try drilling through the bolt.

IMG_5389.JPG

The principle seemed OK:
3/4 inch pipe will guide the drill. Filling the pipe with oil and drilling slowly should prevent burning the drill.

IMG_5388.JPG


All seemed well until I passed the pipe and the drill entered deeper layers of healthy iron and rust around it.

IMG_5385.JPG

Then the drill started to wander and it slipped from iron core into softer surroundings. Shit!

I aborted drilling to minimise damage and lit the pipe to think about next step: how about taking the rust surrounding first - as being softer - and then drill or hammer down the iron core?

From the remaining part of the 3/4 inch pipe I’ve made a simple hole saw: teeth were cut with grinder and sharpened, then hardened with flame and quenching in water.
Hole in the top part gives a grip for simple handle and will be used to extract the pipe if it gets stucked in the deep hole.

IMG_5392.JPG


This setup seems to work better than drilling alone. It bites through softer iron oxide and the pipe accommodates hard iron core of the keel bolt which serves also as guiding.

IMG_5391.JPG


It’s hard physical workout but seeing progress is satisfying. With this approach I intend to go as deep as I can with the pipe and encapsulate the iron bolt inside. Then I can put a steel rod into the pipe and bang the bolt down - with pipe protecting it from buckling to surrounding oak.

To encourage the bolt movement I will heat it up with acetylene burner till it gets red. If that will not make it move I will try breaking the bonds with sledgehammer.
Sharpening or re-making saw teeth will be probably required along the way but the pipe is long so I have some spare material to sacrifice.

Well, that is the current plan.

However - I’ve started planning major rebuilt in coming years - seeing the state of decomposition of these backbone fastenings.
This will be a big job: dropping the ballast keel, opening the bottom of the boat and removing the backbone for making a new oak keel, new floors and new dead wood.
This will enable me replacing all keel bolts at once - and making new dead wood - possibly from plastic bars like the ones used by Louis Sauzedde:
https://www.youtube.com/watch?v=UcBdvChtQkU&list=PLzlN3A2DLgNwWFZPXuH83wDY95x3FPdgD

I’m not 100% purist and deadwood - being a spacer only - is a good candidate to be replaced with something more durable, giving years of trouble-free usage and protecting iron bolts from tannin acid present in oak. Using plastic can also be a good protection if I chose to use bronze bolts in this part of the boat.

Such job will probably require moving the boat from Rosättra Servicevarvet to my own workshop so next year I will reserve place for big workshop in my boat club. This will enable me working undisturbed in my own (rented) space without endangering neighbouring boats.

But this year I want to sail her!
I’ve just picked new main sail from Gdansk - Sailservice:
http://www.sailservice.pl/about-us/

The sail looks beautiful, costs less than half of the cost I would need to pay in Sweden - and folks in Gdansk are very responsive and very fast in building sails. And they don’t ask stupid questions like Gransegel: why do you need 3 reefing lines on the the sail… Well, Gransegel - not your business! I want them and I pay for them!

Well, till next time - let’s see if hole saw and sledge hammer will make a trick with this stubborn keel bolt #3.

December 30, 2018 /Lukasz Kumanowski
Comment

Keel bolt #3 - Next steps

December 18, 2018 by Lukasz Kumanowski

I gave more thoughts to the idea of banging down remainings of the keel bolt and decided to try something else. After all - smashing rusted iron into oak might lead to more problems. And I can always resolve to this once I exhaust all other, more civilised, methods.

So - the problem looks like on below simulation:

Simplified model of keel bolts accessible from the main cabin. There are more of them but this year I intend to replace 4 main bolts.

Two front bolts are removed. Remaining bolts, including one which got stucked, go through thick layer of deadwood (oak). It is this wood which most probably caused bolts to rust entirely, yielding failure at removal.

I imagine that remaining part of bolt #3 looks like thin iron rod surrounded by brittle iron-oxide which expanded into oak around, thus sitting very tight.

The plan is to drill out the core (iron) with thin drill and then re-drill the whole sandwich with appropriate sized drill bit.

Challenges:

  • get the pilot hole straight through iron core, without it wandering into oak

  • get appropriate sized drill bits to go through circa 85cm sandwich

For the first problem I intend to use steel pipe as a guide.
I’ve found very nice, thick-walled stainless pipe of external diameter matching exactly nominal hole diameter: 3/4 inch. Internal pipe’s diameter is 14,5mm so I need 14mm drill bit which will slide into the pipe and use it as guidance for first few centimeters of drilling. After that it should be less tricky.

Second problem can be addressed in 2 ways: either get a small bit and weld it to a pipe or rod of appropriate diameter or try to find ready bit which is long enough. The second way is obviously better - the drill will be straight and equally strong along the whole body. The last thing I want is a broken drill of hardened steel sitting in this hole if welded joint fails.

Kell advised to check Flinks Järn. Indeed they have long drills but unfortunately they sell stuff only to companies, not private persons like me. Too bad.

Luckily my local hardware shops: Roslags Järn and Swedol have metal drills (Milwaukee and Bosch) of appropriate diameter for pilot hole. Length is little too short - 600mm - but… “beggars can’t be chosers” so I bought these tools.

I’m not worried that battery-drill will not be up to the job: this thing has more torque than my sledgehammer or my old electric drill.

I will start with 14mm bit guided in a pipe. If that will be too hard I will go smaller - 12mm bit - with some nylon or teflon bushings to keep it centered in the pipe. Hopefully this will make a lengthy pilot hole for next step: 18mm drill. The remaining part of keel bolt, as drills will not reach all the way to iron ballast, will have to be banged down with heavy hammer or sledgehammer with concrete drill. And of course lots of heat!

Now: the problem is that my boat, being built in Sweden in 50’s, has most metal fastenings made in ANSI standard, not metric. Hence - the awkward 19mm diameter hole and bolts threaded 5/8 UNC. Metric drills do not cover this dimension, instead there is 18 and 20mm step. I figure that after drilling 18mm pilot hole I can smash down remaining 1mm of iron-oxide while driving new keel bolt into the hole.

In case that does not work I can re-drill the hole into 20mm diameter but that will also require drilling in cast iron, getting new thicker bolt, different nut size and thread on this bolt.
Not perfect - I’ll need another set of tools to remove it in 10 years, for inspection or replacement. Well, that is a backup solution for now.

Another way is to use this steel pipe to clean the oxide debris to required diameter. Either I will just hammer down the pipe, having sharpened bottom edge, or I will form this edge into circular saw, harden it with quenching and attach handle on top to spin the pipe as a hand drill.

Should that not work - I will use concrete drill (they come in 1m size or longer) with pneumatic sledge hammer. Last resort, brutal but my sledgehammer is gathering dust so some exercise would be perfect.

These are the ideas for now. They need to wait until after Christmas so maybe I will figure out yet another way, like - pouring phosphoric acid into this damn hole???
Good thread on WoddenBoatForum about different ways: http://forum.woodenboat.com/showthread.php?138318-Removing-iron-Keel-bolts/page2

Anyway - don’t wait with checking or replacing old bolts. Definitely not for 60 years. Removal of healthy bolts is easy and well worth the effort. Otherwise you get yourself into my situation.
Thanks to previous owners of Meritaten…


December 18, 2018 /Lukasz Kumanowski
Comment

Keel bolt #3 - Big Bang!

December 16, 2018 by Lukasz Kumanowski

I was eager to get to this bolt as it is one of two bolts accessible from the cabin and going through the dead wood. According to Janne Gustavsson these bolts are usually in worst condition.

Given far-from-perfect condition of other bolts I wanted to check this one a.s.a.p.

Melting the lead took usual amount of time (and 2 oxygen cartridges). Once I unscrew the nut I followed my usual procedure: set up the jigg inside the boat, pump hydraulic jacks so that the bolt is tensioned and heat the bolt in keel pocket with MAPP torch. So I did.

Then back to pumping the jacks. Slowly. I was about to go down to check if the thread disappeared in keel pocket when someone fired a gun and my jig broke into pieces!

No one was hurt so after shaking the shock I started inspecting the jig - what has failed? Well, nothing in the jig - it was this damn keel bolt which failed! What a sound!


In the keel pocket the thread still sits where it was. So nothing moved - the bolt is stuck for good (or bad) in all this deadwood (oak).

Keel bolt on the right goes through dead wood before it reaches wooden keel and floors in the boat

Keel bolt on the right goes through dead wood before it reaches wooden keel and floors in the boat

So we move to Plan B:

I will try pushing the remaining part of the screw down into keel pocket. To do that I need 18-19mm diameter steel pipe which I will insert into the floors’ hole. This pipe will act as a guide and protection of drilled wood. Steel rod of diameter slightly smaller than pipe’s internal diameter will be used to hammer the screw down.

Hopefully this will make the screw moving down. After it reaches the bottom of keel pocket I will need to cut it and continue hammering until the whole thing is removed. Sounds like lots of fun…

Of course there are also plan C and plan D:

I can leave this bolt in place and try my luck with another one (plan C) or I can drop the keel and get access to all these bolts (plan D, major job).

Plan E, if the next bolt will also brake, is to build new floors (oak) and sister this stuck bolt with 2 thinner bolts on each side. This way I will use the same keel pocket but I’ll need to drill in cast iron and dead wood.

Let’s hope for the best (plan B).

December 16, 2018 /Lukasz Kumanowski
Comment

Keel bolt #2 - Extraction

December 15, 2018 by Lukasz Kumanowski

Back to metal work!

Keel bolt nr 2 was little more dramatic to extract - this time it made thumping noise when I was pumping it through oak. But luckily that was the only difference, otherwise extraction went smooth.

Judging from the state of this bolt it was high time to change it. Similarly to bolt nr 1 it corroded mostly on interface between oak keel and oak floor - and inside the floor. The part sitting in iron is in quite good shape. That tells me that ballast-to-oak keel interface is still tight (no salt water ingress) and corrosion is mostly caused by tannin acid in oak.

I’m trying to decide what should I use for new bolts. Wrought iron is out of question: there is only one place on the Globe which still sells it (in UK) but even they don’t produce it any longer, they re-use scrap wrought iron. I doubt I can get constant quality on bolts which are 80cm long.

There is also ductile iron (used in sewage pipes under ground) which is still made today. It is very close on galvanic table to cast iron (my keel) and would be very suitable.
But - it is hard to find in Sweden or Germany if you don’t need 10 tons. Apparently this is not a product for small customers.

Then there is mild steel. I could go with that given it is cheap and readily available. Hot dip galvanising could add some corrosion resistance and I can check the state in 5 years. However - my bolts are 3/4 inch in diameter (19 mm). The closest diameter for mild steel is 20mm with tolerances up to 1mm. That means I would need to machine it to required dimensions and that is tricky with so long material.

Björn proposed silver steel. This is sold in 19mm diameter and tolerances are 50 micrometers. Really nice. This is high carbon steel with some addition of vanadium and molybdenum. This alloy is used for making tools like screwdrivers, drills, auger bits etc. Sold as raw it is in annealed state which makes it easier to machine. After machining one can chose to harden it to required Rockwell grade. Very nice material, a bit expensive but not over the top.

There are also super-alloys like alloy C276 or AL-6XN. These are used on oil riggs and are formulated to be extremely resistant to salt water corrosion, SCC (stress corrosion cracking) in chloride and to inhibit crevice corrosion (pitting). Nice, but where do I get one???

I lean towards silver steel. At least Björn has found the source in Stockholm and I found it at my local metal shop.

I will definitely try to shield it from oak with some primer, maybe epoxy tar or something similar. And - I will check the state in 5 years.

So without further due - I started melting the pocket to reach the third bolt.

Sources for more information about super-alloys:

https://www.shallcrossbolt.com/sea-water-corrosion-monel-titanium-al-6xn-to-the-rescue/

http://www.metalcor.de/en/datenblatt/29/

https://www.csidesigns.com/products/superalloys/al-6xn

https://sverige.myjacquet.com/files/JCQsverige-fichetech-c276.pdf

http://forum.woodenboat.com/showthread.php?4719-Fastenings-with-an-iron-keel

Silver steel:

https://www.hunker.com/12513089/properties-of-silver-steel

December 15, 2018 /Lukasz Kumanowski
Comment
  • Newer
  • Older

Powered by Squarespace